There are many myths on the Oracle database. Many of those myths were true statements versions ago, but became myths because the Oracle database developers outsmarted the limitations. There was a myth that said that you should put non-null columns in the beginning of the table and null columns at the end. This was because in earlier versions a null column in a row did not take space until there was a filled column after it. In that case the database preallocated space for the null column to save on re-allocation efforts. But I learned that the storing-techniques of the database were improved in a way that this statement became a myth. Although it is still a good practice to have a standard on organizing your tables.
I know quite a lot of the Oracle database. But most of it is from using the modern ones and carrying the lugage of courses in the older ones. I know how a car and it's engine theoretically work, but I have no up-to-date knowlegde of the internals of the modern car. In the same way I have to rely on what I hear from other experts and co-workers about statements as above. So I keep my ears open and carefull about spreading myths.
This week a valued co-worker came with a DDL-script to create a table with Char-columns. My first reaction was that he should replace the CHARs with VARCHAR2s. Since a Varchar, as suggested by it's name, should occupy space related to it's fillings, while a CHAR occupies space according to it's maximum size. Though this was true, I was not sure if this statement was passed over by the reality of the modern database's storage techniques.
But according to Tom Kyte, the statement still holds (article started in 2001, but is updated recently). However, browsing to the end of the article's list of comments, I read: if a char or a varchar2 column is null, than it does not take more room then is needed to hold the null-value.
So myth confirmed...
Tuesday, 30 June 2009
Monday, 15 June 2009
Hello Metro
Developing Hello World with Eclipse
In my previous article I wrote about installing Metro and Glassfish. That article is the prelude for this one. Developing webservices using a toolstack like Metro (as alternative for Apache Axis for example) opposed to developing them in your Application Servers native technology gives you more flexibility in choosing your deployment target. You may rightfully respond with stating that Metro is the native technology of Sun's Glassfish Application Server. It is in fact part of it. But Metro is also available as a separate library for other Application Servers or even standalone clients.The basics of developing a webservice using Metro in Eclipse is written at: https://metro.dev.java.net/guide/Developing_with_Eclipse.html.
When having your workspace on a network share, define a drive-letter for it or a mount point (for example: /home/makker/workspace) and don’t use the windows-network-path reference (\\networkhost\Share$\makker). Otherwise deployment may fail because of ‘file not found errors’.
A HelloWorld webservice using Metro in Eclipse is really simple.
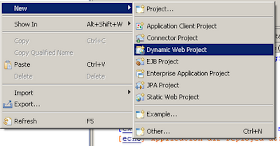
1. Create a new dynamic Web Project:
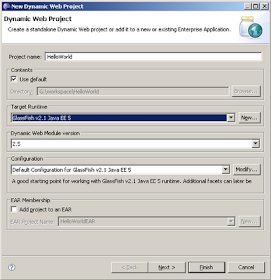
 2.Name it HelloWorldWS and choose Glassfish as target runtime:and choose Next:
3. Specify the context Root (For example HelloWorldWS):
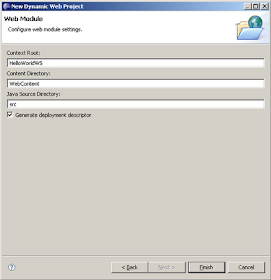
4. And click Finish.
5. Then create a HelloWorld java Class, from the new-gallery:
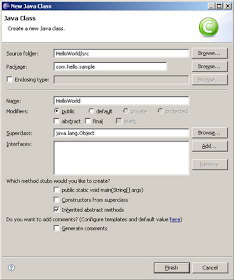
6.Implement the following code:
package com.hello.sample;
import javax.jws.WebService;
@WebService(name="HelloWorldWS", serviceName="HelloWorldWS")
public class HelloWorld {
public String hello(String name){
return "Hello "+name;
}
}
It’s all about the WebService annotation really.7. Go to your GlassFish server in the Servers tab and right click -> ‘Add and Remove Projects’. Shuttle your HelloWorld project to the right.
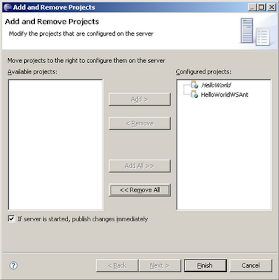
8. Click Finish. The project will be synchronized with the server automatically. If you do a change then with Right Click>Publish you can synchronize again.
9. The wsdl will be on: http://localhost:8080/HelloWorld/HelloWorldWS?wsdl
10. This can be tested with SoapUI.
Create a HelloWorld Webservice using Ant
The same project can be created using ANT. This is especially usefull when the source may change during development. And when deploying to a another AS then Glassfish.To generate the necessary webservice code from java-source (bottom-up), APT (Annotation Processor Tool) is used. For Apt an Ant task exist.
For starting your project from WSDL (top-down) also API's and corresponding Ant taks are available. With Metro samples are delivered to show how to do that.
Again create a Dynamic Web Project, like above.
Then create a build.xml script like:
 <?xml version="1.0" encoding="UTF-8"?>
<project basedir="." default="help" name="HelloWorld">
<!-- ********** Imports ********** -->
<!-- import base settings -->
<import file="etc/config.xml"/>
<!-- Set jaxws-Class Path -->
<path id="jaxws.classpath">
<pathelement location="${java.home}/../lib/tools.jar"/>
<fileset dir="${metro.lib.home}">
<include name="*.jar"/>
<exclude name="j2ee.jar"/>
</fileset>
</path>
<!-- ********** Task Defs ********** -->
<!-- Import Apt Task Def based on jaxws-classpath -->
<taskdef name="apt" classname="com.sun.tools.ws.ant.Apt">
<classpath refid="jaxws.classpath"/>
</taskdef>
<!-- clean -->
<target name="clean">
<delete dir="${build.home}" includeEmptyDirs="true"/>
<delete dir="${wsdl.home}"/>
<delete file="${webcontent.webinf.home}/sun-jaxws.xml"/>
<delete file="${webcontent.webinf.home}/web.xml"/>
</target>
<!-- Targets -->
<target name="setup">
<mkdir dir="${build.home}"/>
<mkdir dir="${build.classes.home}"/>
<mkdir dir="${webcontent.home}"/>
<mkdir dir="${webcontent.webinf.home}"/>
<!--   <mkdir dir="${wsdl.home}"/>-->
</target>
<!-- Build webservice based on Java-Source -->
<target name="build-server-java" depends="setup">
<echo message="Apt: Generate WebService"/>
<apt
   fork="true"
   debug="true"
   verbose="${verbose}"
   destdir="${build.classes.home}"
   sourcedestdir="${basedir}/src"
   sourcepath="${basedir}/src">
<classpath>
   <path refid="jaxws.classpath"/>
   <pathelement location="${basedir}/src"/>
</classpath>
<option key="r" value="${build.home}"/>
<source dir="${basedir}/src">
   <include name="**/com/rabo/samples/*.java"/>
</source>
</apt>
<echo message="Copy: Jaxws Deployment Descriptor"/>
<!--  copy jaxws deployment descriptors -->
<copy todir="${webcontent.webinf.home}">
<fileset dir="${basedir}/etc/deployment">
   <include name="sun-jaxws.xml"/>
</fileset>
</copy>
</target>
<!-- Help! (default)  -->
<target name="help">
<!--        <echo message="AS_HOME:            ${as.home}"/>-->
<echo message="Settings:"/>
<echo message="METRO_HOME:        ${metro.home}"/>
<echo message=""/>
<echo message="Targets:"/>
<echo message="server:            Generate & build webservice"/>
</target>
<!-- Generate and Build the webservice -->
<target name="server" depends="setup">
<antcall target="clean"/>
<antcall target="build-server-java"/>
</target>

</project>
It expects a config.xml file in the *project*/etc folder:
<project>
<!-- Environment Variables -->
<property environment="env"/>
<!-- Application Server Home (env var AS_HOME must be set) -->
<property name="as.home" value="${env.AS_HOME}"/>
<!-- Metro Home (env var METRO_HOME must be set) -->
<property name="metro.home" value="${env.METRO_HOME}"/>
<property name="metro.lib.home" value="${metro.home}/lib"/>
<property name="source.home" value="${basedir}/src"/>
<property name="build.home" value="${basedir}/build"/>
<property name="build.classes.home" value="${build.home}/classes"/>
<property name="webcontent.home" value="${basedir}/WebContent"/>
<property name="webcontent.webinf.home" value="${webcontent.home}/WEB-INF"/>
<property name="wsdl.home" value="${webcontent.webinf.home}/wsdl"/>
</project>
The scripts expect JAVA_HOME and METRO_HOME to be set.
Create the same java class as in the former example:
package com.hello.sample;
import javax.jws.WebService;
@WebService(name="HelloWorldWSAnt", serviceName="HelloWorldWSAnt")
public class HelloWorld {
public String hello(String name){
return "Hello "+name+"! Used Ant to generate this.";
}
}
This time I changed the name and the service name to distinguish from the former example.
To generate the webservice code perform:
ant server
The ant script also places a web.xml, and a sun-jaxws.xml into the WebContent/WEB_INF folder. It expects these files in the /etc/deployment folder.
The sun-jaxws.xml file should look like:
<?xml version="1.0" encoding="UTF-8"?>

<!--
DO NOT ALTER OR REMOVE COPYRIGHT NOTICES OR THIS HEADER.

Copyright 1997-2007 Sun Microsystems, Inc. All rights reserved.

The contents of this file are subject to the terms of either the GNU
General Public License Version 2 only ("GPL") or the Common Development
and Distribution License("CDDL") (collectively, the "License").  You
may not use this file except in compliance with the License. You can obtain
a copy of the License at https://glassfish.dev.java.net/public/CDDL+GPL.html
or glassfish/bootstrap/legal/LICENSE.txt.  See the License for the specific
language governing permissions and limitations under the License.

When distributing the software, include this License Header Notice in each
file and include the License file at glassfish/bootstrap/legal/LICENSE.txt.
Sun designates this particular file as subject to the "Classpath" exception
as provided by Sun in the GPL Version 2 section of the License file that
accompanied this code.  If applicable, add the following below the License
Header, with the fields enclosed by brackets [] replaced by your own
identifying information: "Portions Copyrighted [year]
[name of copyright owner]"

Contributor(s):

If you wish your version of this file to be governed by only the CDDL or
only the GPL Version 2, indicate your decision by adding "[Contributor]
elects to include this software in this distribution under the [CDDL or GPL
Version 2] license."  If you don't indicate a single choice of license, a
recipient has the option to distribute your version of this file under
either the CDDL, the GPL Version 2 or to extend the choice of license to
its licensees as provided above.  However, if you add GPL Version 2 code
and therefore, elected the GPL Version 2 license, then the option applies
only if the new code is made subject to such option by the copyright
holder.
-->

<endpoints xmlns='http://java.sun.com/xml/ns/jax-ws/ri/runtime' version='2.0'>
<endpoint
name='HelloWorldWSAnt'
implementation='com.rabo.samples.HelloWorld'
url-pattern='/HelloWorldWSAnt'/>
</endpoints>
It’s in fact the deployment file for Metro. For deployment on Glassfish this is enough. Apparently deploying to Glassfish from Eclipse would not need this file.
For deployment to a non-glassfish application server (like Weblogic), you would also need a valid Web.xml. This file should look like:
<?xml version="1.0" encoding="UTF-8" standalone="no"?>
<web-app version="2.4" xmlns="http://java.sun.com/xml/ns/j2ee"
xmlns:xsi="http://www.w3.org/2001/XMLSchema-instance"
xsi:schemaLocation="http://java.sun.com/xml/ns/j2ee
http://java.sun.com/xml/ns/j2ee/web-app_2_4.xsd">
<display-name>HelloWorldWSAnt</display-name>
<listener>
<listener-class>com.sun.xml.ws.transport.http.servlet.WSServletContextListener</listener-class>
</listener>
<servlet>
<servlet-name>HelloWorldWSAnt</servlet-name>
<servlet-class>com.sun.xml.ws.transport.http.servlet.WSServlet</servlet-class>
<load-on-startup>1</load-on-startup>
</servlet>
<servlet-mapping>
<servlet-name>HelloWorldWSAnt</servlet-name>
<url-pattern>/HelloWorldWSAnt</url-pattern>
</servlet-mapping>
<session-config>
 <session-timeout>60</session-timeout>
</session-config>
<welcome-file-list>
<welcome-file>index.html</welcome-file>
</welcome-file-list>
</web-app>
This Web-deployment file is generated when deploying to Glassfish from Eclipse. So don’t use this file in the WEB_INF folder in the Glassfish case. The web.xml will then be generated. The generated web.xml file will point to a JAXWSServlet class in the Glassfish application server. Other application servers will also have an own version of this class. In the above web.xml a specific Metro Servlet listener is initiated. Also the webservice will point to a Metro servlet implementation. Than on run-time Metro will generate the webservice and service it.
Deploy to Weblogic 10.3
For deployment to Weblogic 10.3 you need to install one of course, and create a domain.Creating a domain can be done using the configuration wizard. On windows: All Programs> Oracle Weblogic>Weblogic Server 10gR3>tools>Configuration Wizard
(references: C:\utils\weblogicserver10.3\wlserver_10.3\common\bin\config.exe)
Then you’ll need to install Metro in Weblogic. This is done by copying the following files to the *weblogic-domain-home*/lib (for example C:\utils\weblogicserver10.3\domains\base_domain\lib\):
- webservices-rt.jar
- webservices-tools.jar
- webservices-api.jar
After this you have to restart your domain.
You can add Weblogic to Eclipse the same way as Glassfish. You’ll have to install the Weblogic pluging though. Choose the ones from the Oracle main entry (not the BEA), because Weblogic 10.3 is from the Oracle BEA era.
You cannot deploy your project by publishing it from Eclipse. Eclipse will complain that Weblogic will not support the sun-jaxws.xml deployment descriptor.
In your HelloWorld project, make sure you have your java source, web.xml and sun-jaxws.xml compiled and in the right folders. Then export your project to a WAR file.
This War file can be deployed to Weblogic using the console (localhost:7001/console). In the console click on Deployments and then install or update. Upload the war to *weblogic-domain-home*\servers\AdminServer\upload\ . If you point directly to your war-file, it is locked by Weblogic.
Weblogic will see that it is a Web-application, but it will not see the Webservice. This is probably because the wsdl and xsd are generated by Metro on deployment time/startup of the Webapplication So you cannot test it from the console. But the wsdl will be on:
http://localhost:7001/HelloWorldWSAnt/HelloWorldWSAnt?wsdl.
I did not try it yet, but it might be possible to register the generated wsdl as a post-deploy step in WebLogic. Maybe that this enables the console to better manage the webservice application.
Usefull Annotations
Earlier I mentioned that it's all in the Annotation really. In the above example I used the bottom-up approach (in the Metro-samples called the "from-java" approach). The HelloWorld example just receives a string and responses with one. But in reqular projects you want to return more sophisticated structures. And then you might want to do the top-down approach, starting with WSDL. The side affect there is that if you change the WSDL you generate the java-implementations, but you have to manually recouple those with your functional code.I did the from-java approach so I create a compilable set of my functional and webservice code. And then I generate the webservice (XSD and WSDL). This is very usefull if you're in control of the interface. But then you need an enhanced set of annotations to refine your interface.
With this set I managed to manipulate the outcome of my WSDL and XSD generation to match the design. The full description of the annotation you can find at file:///*metro-home*/docs/annotations.html or in the Latest Online Doc: https://jax-ws.dev.java.net/nonav/2.1.7/docs/annotations.html.
Webservice
This is, I think, the basic annotation. This makes the webservice. Actually you need only this one to turn a class into a webservice.
Example: @WebService(name="HelloWorldWS", serviceName="HelloWorldWS")
Other attributes:
- targetNamespace
- endpointInterface
- portName
- wsdlLocation (Not currently used by Metro 1.5 FCS)
This one just denotes which methods are to be exposed as Webservice Operations.
Example: @WebMethod
Attributes:
- operationName (defaults to the java name)
- action (namespace of the wsdl)
- exclude (to exclude the method from the webservice, defaults to false)
WebParam
To specify the name of the parameter as it appears in the Schema of the request message in the generated XSD. If not used, the parameters are named positional, like 'arg0', 'arg1', ...
Example: @WebParam(name="userName") String userName
Other Attributes:
- targetNamespace
- mode
- header
Name of the result variable, the root element in the response message in the XSD.
Example: @WebResult(name="Greeting")
RequestWrapper and ResponseWrapper
These I found are very usefull. With these you can influence the name of the request and response messages, theire namespace and the name of the generated request and response classes.
Example:
@RequestWrapper(localName = "HelloWorldReq", targetNamespace = "http://webservice.darwin-it.nl/", className = "nl.darwin-it.webservice.jaxws.HelloWorld")
@ResponseWrapper(localName = "HelloWorldRsp", targetNamespace = "http://webservice.darwin-it.nl/", className = "nl.darwin-it.webservice.jaxws.HelloWorldResponse")
Mark that for these two the webservices-api.jar has to be added to your project. You might have the GlassFish 2.1 Java EE 5 system library added but this does not have the webservices-api.jar added to it. The corresponding classes for these two annotations are there.
You have to do these imports:
- import javax.xml.ws.RequestWrapper;
- import javax.xml.ws.ResponseWrapper;
Overall example:
package com.hello.sample;
import javax.jws.WebMethod;
import javax.jws.WebParam;
import javax.jws.WebResult;
import javax.jws.WebService;
import javax.xml.ws.RequestWrapper;
import javax.xml.ws.ResponseWrapper;
@WebService(name="HelloWorldWS", serviceName="HelloWorldWS")
public class HelloWorld {
  @WebMethod
  @WebResult(name="Greeting")
  @RequestWrapper(localName = "HelloWorldReq", targetNamespace = "http://webservice.darwin-it.nl/", className = "nl.darwin-it.webservice.jaxws.HelloWorld")
  @ResponseWrapper(localName = "HelloWorldRsp", targetNamespace = "http://webservice.darwin-it.nl/", className = "nl.darwin-it.webservice.jaxws.HelloWorldResponse")
  public String hello( @WebParam(name="userName") String name){
      return "Hello "+name;
  }
}
Conclusions and More information
With Metro it is really easy to generate an Application Server independend Webservice. With the annotations it is also possible to influence the outcome of the XSD and WSDL generation.For more information:
- Metro Offline Documentation: file:///*metro-home*/docs/index.html
- User Guide: https://jax-ws.dev.java.net/guide/
- Latest RI Doc: https://jax-ws.dev.java.net/nonav/2.1.7/docs/index.html
Installing Metro and Glassfish
For a new customer I'm looking at using Sun's Metro. Metro is in fact a SOAP toolstack similar to Apache's Axis. We want to develop webservices that are independent to the application server it has to run. In the end it has to run on Websphere, but this is not what we have on our development PC's. So I created a simple HelloWorld webservice, that I deployed to a Glassfish server. Getting it to work on Glassfish should not be too hard, since it is delivered with Metro (both products of Sun), although I upgraded it. But having it working I tried to get it to work in Weblogic. I may assume that having it working on Weblogic it should also be deployable to Websphere.
In this article I'll summarize my steps on installing Metro and Glassfish. In a follow-up, I'll expand on creating a HelloWorld webservice to deploy on Glassfish and Weblogic. I'll assume that installing Weblogic is straightforward and doable by anyone that can download the installer from otn.oracle.com.
The recommended or required setup for developing webservices using Metro and Eclipse can be found on: https://metro.dev.java.net/guide/Required_Software.html.
Based on this list I build following list:
Installing metro goes about the same.
To have Glassfish started and stopped in Eclipse you’ll need to add Glassfish as a Server. By default Eclipse does not know how to handle J2EE servers like Glassfish. So you’ll have to install the Glassfish plug-in
I find it convenient to have Application Servers Admin consoles started in an external browser (Firefox) when opened from Eclipse. To have that, choose Window>Web Browser> 2. Firefox (depending on given choices and possible browsers install sequence).
When you manually start or stop a J2EE server that is registered with Eclipse, Eclipse will know…
You can add Weblogic to Eclipse the same way as Glassfish. You’ll have to install the Weblogic pluging though. Choose the ones from the Oracle main entry (not the BEA), because Weblogic 10.3 is from the Oracle BEA era.
In this article I'll summarize my steps on installing Metro and Glassfish. In a follow-up, I'll expand on creating a HelloWorld webservice to deploy on Glassfish and Weblogic. I'll assume that installing Weblogic is straightforward and doable by anyone that can download the installer from otn.oracle.com.
Download
Required Software
The recommended or required setup for developing webservices using Metro and Eclipse can be found on: https://metro.dev.java.net/guide/Required_Software.html.
Based on this list I build following list:
- Java JDK 6 (1.6.0_13)
- Glassfish for J2EE Webservice deployment. Used Version 2.1.1, latest production.
- Metro 1.5
- Eclipse. Used Eclipse 3.4.2.
- soapUI. Used 2.5
Download Metro and Glassfish
- Glassfish: https://glassfish.dev.java.net/downloads/v2.1-b60e.html
- Metro: https://metro.dev.java.net/1.5/
Install Glassfish and Metro
- First install Glassfish. To do that you need to execute the following command:
- Go to the glassfish directory:
- Perform the setup using ant. The ant delivered with Glassfish is 1.7.1. You could use this one. But if you have the same already installed elsewhere on your system you could ofcourse use that.
- The setup will configure glassfish for the following ports:
- Using port 4848 for Admin.
- Using port 8080 for HTTP Instance.
- Using port 7676 for JMS.
- Using port 3700 for IIOP.
- Using port 8181 for HTTP_SSL.
- Using default port 3820 for IIOP_SSL.
- Using default port 3920 for IIOP_MUTUALAUTH.
- Using default port 8686 for JMX_ADMIN.
- The Login information is stored in seperate file on the user’s home directory.
- Default username for the admin user is: ‘admin’, the password is: ‘adminadmin’.
java -Xms256M -Xmx384M -jar glassfish-installer-v2.1-b60e-windows.jar
It appears that the default minimal heapspace is not enough. Following the user-guide a minimum of 256M should be used.
The command above just unpacks the installation to a subdirectory called ‘glassfish’.. The actual setup is done using ant.
cd glassfish
chmod -R +x lib/ant/bin
lib\ant\bin\ant -f setup.xml
Installing metro goes about the same.
- Extract metro using:
- Metro is included in Glassfish. But the used Glassfish is from January 23rd 2009 and Metro April 17th 2009. So I suggest updating Metro to be sure we have the latest version.
java -jar metro-1_5.jar
ant -Das.home=*gf_install_dir* -f *metro_install_dir*/metro-on-glassfish.xml installFor example
ant -Das.home=c:\utils\glassfish -f c:\utils\metro\metro-on-glassfish.xml install
Install Eclipse Glassfish plug-in and add Glassfish Server
To have Glassfish started and stopped in Eclipse you’ll need to add Glassfish as a Server. By default Eclipse does not know how to handle J2EE servers like Glassfish. So you’ll have to install the Glassfish plug-in
- Open the J2EE perspective
- If needed (and not already done) set your proxy-Server, to get plug-ins downloaded.
- Go to Window > Preferences > General > Network Connections.
- Determine your proxy-server. For example, get it from your browser connection-settings.
- Set the Proxy. Normally use the same proxy for all protocols.
- Go to the Servers tab (below)
- Right-Click > New Server > Download Plugins
- Choose the appropriate Glassfish version (Glassfish Java EE 5 Server), accepteer license, etc.and follow the further next-next-finish pages.
- In the Server Tab, Right-Click > New Server again.
- In the Select server type pane, choose Glassfish>Glassfish v2.1 Java EE 5. and choose next
- Fill in or ensure you have the following details:
- Domain name: domain1
- Domain directory: *glassfish-home*/domains
- Administrator Id: admin
- Administrator Password: adminadmin
- Follow the wizard to the end and press finish.
I find it convenient to have Application Servers Admin consoles started in an external browser (Firefox) when opened from Eclipse. To have that, choose Window>Web Browser> 2. Firefox (depending on given choices and possible browsers install sequence).
When you manually start or stop a J2EE server that is registered with Eclipse, Eclipse will know…
You can add Weblogic to Eclipse the same way as Glassfish. You’ll have to install the Weblogic pluging though. Choose the ones from the Oracle main entry (not the BEA), because Weblogic 10.3 is from the Oracle BEA era.
Starting and stopping glasfish by hand
You might want to start/stop Glassfish by hand. The default domain of Glassfish is domain1. To start the domain:asadmin start-domain domain1To stop it:
asadmin stop-domain domain1Where asadmin is in the *glassfish-home*/bin, for example: c:\utils\glassfish\bin.
Wednesday, 3 June 2009
OpenSuse Antivirus
On Windows, when I (re-)configure PC for friends and family, I install AVG Antivir for them. It's free, and I've pretty good experiences with it. That is: it runs and updates quite smoothly.
For Linux I've found that they're one of the few with a free product for linux. There's also Clam, but I've not tried that one.
You can download the Antivir product from their site. But I've found that installing it from Yast2 is more convenient, installing also menu-items and so on.
In Yast2 search for 'antivir' and check:
After installation, there are two things left to do.
Enabling AVGuard
The avguard is not started right away. Following this post, you have to edit the file /etc/avguard.conf so that it ends like:
Refreshing License file
The updater complaints of an expired key. So following this post, you have to download a new license file from here.
Then remove or backup the old one and replace it with the new one:
For Linux I've found that they're one of the few with a free product for linux. There's also Clam, but I've not tried that one.
You can download the Antivir product from their site. But I've found that installing it from Yast2 is more convenient, installing also menu-items and so on.
In Yast2 search for 'antivir' and check:
- antivir
- antivir-avguard
- antivir-gui
After installation, there are two things left to do.
Enabling AVGuard
The avguard is not started right away. Following this post, you have to edit the file /etc/avguard.conf so that it ends like:
# Enable and configure GUI support
GuiSupport yes
GuiCAFile /usr/lib/AntiVir/gui/cert/cacert.pem
GuiCertFile /usr/lib/AntiVir/gui/cert/server.pem
GuiCertPass antivir_default
Refreshing License file
The updater complaints of an expired key. So following this post, you have to download a new license file from here.
Then remove or backup the old one and replace it with the new one:
- cd /usr/lib/Antivir
- mkdir bck
- mv hbedv.key bck
- cp /home/makker/Zarchief/hbedv.key .
