Tuesday, 29 September 2020

Logging in SOA Suite BPEL

This article feels like I should have written years ago. As it is, I haven't, but let's do it anyway.

A few weeks ago a (somewhat older) question on community.oracle.com caught my attention. It was about how to do logging in Oracle SOA Suite. 

This very much possible, and it can be simply done using an Embedded Java activity. However, if you want to have multiple loggings in a larger BPEL process, or have multiple BPEL components in a composite with multiple loggings scattered all over them, then Embedded Java activities aren't that practical.

So, I have developed a bit more sophisticated solution. For just one logging, it is a bit overdone, but I find it more practical with multiple loggings.

It starts with a quite simple Log wrapper class, that I added to GitHub. It is a wrapper around Java Util Logging, and helps with instantiating with a Logger instance. One of the constructors takes in a compositeName and componentName:

public class Log {
    private static final String BASE_PACKAGE="oracle.soa.bpel";
    private static Logger log;
    private String className;
...
    public Log(Class loggingClass) {
        super();
        setClassName(loggingClass.getName());
        log = Logger.getLogger(getClassName());
    }
    
    public Log(String loggingClass) {
        super();
        setClassName(loggingClass);
        log = Logger.getLogger(getClassName());
    }

    public Log(String compositeName, String componentName) {
        super();
        String loggingClass = BASE_PACKAGE+"."+compositeName+"."+componentName;             
        setClassName(loggingClass);
        log = Logger.getLogger(getClassName());
    }

An important aspect here is the static variable BASE_PACKAGE which is set to "oracle.soa.bpel". Which I'll get back to in a minute. The constructor uses this, and the compositeName and compentName to build up a sort of className, that it prefixes with the BASE_PACKAGE.

It also has some logging methods, that requires a methodName, that it uses as an extra identifier for the logging, added to the full class Name.

This class I 'deployed' to a jar file. This makes it reusable in multiple composites, while the source is versioned only once.

 Add it to the SCA_INF/lib folder of your composite:

But you could probably also add it to the oracle.soa.ext_11.1.1 folder in your $MW_HOME/soa/soa/modules folder and run the Ant script there: 

After running Ant in that folder, you should restart the server. The Ant script will add all the jar files in that folder, including yours, to the manifest file of the oracle.soa.ext.jar file in that folder. Doing so, it will be appended to the Classpath of SOA Suite.

To use this in your BPEL, it is important to add the following line at the beginning:

<import location="nl.darwinit.soautils.logging.Log" importType="http://schemas.oracle.com/bpel/extension/java"/>

Like this:

Having done that you can use the Log class in the Embbeded Java activity. To begin with, I find it usefull to add an Embedded Java to a scope which contains simple xsd:string based variables. Using an Assign you can easily assing proper values to the local variables:

The compositeName and componentName variables can be filled with ora:getCompositeName() and ora:getComponentName() respectively. Doing so makes it easier to access these values in an Embedded Java activity. The Java snippet Embedded Java in my example project is:

String compositeName = (String) getVariableData("compositeName");      
String componentName = (String) getVariableData("componentName");      
String text = (String) getVariableData("text");      
String methodName= (String) getVariableData("methodName");      
Log log = new Log(compositeName,componentName);     
  
String message="**** BPEL "+methodName +" " + text +" ****";    
log.info(methodName, message);    
addAuditTrailEntry(message);

The addAuditTrailEntry() shown in this snippet is an API that adds the message to the flowtrace also:


So not necessary for logging and also not specifically in scope of this article, but good to mention.
The message build up in this snippet is a concatenation of: "**** BPEL "+methodName +" " + text +" ****". This maybe handy in the AuditTrail, but in the log you may want to show just the text, like: log.info(methodName, text).

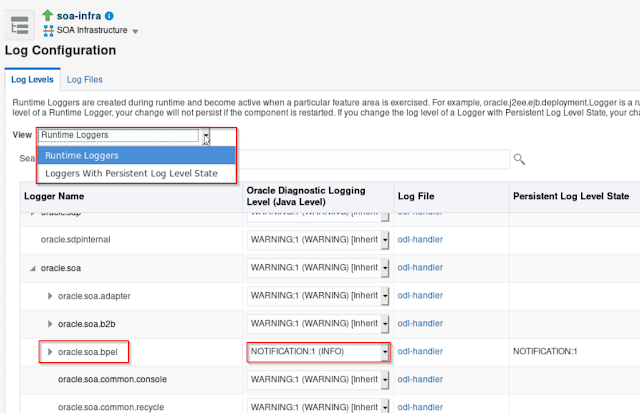
Earlier I mentioned the BASE_PACKAGE variable in the Log class. This refers to the oracle.soa.bpel log-appender. This can be configured in the soa-infra Log Configuration:


And then:

You could add a custom Logger, but it is easier to use an existing one. And to me it makes sense to use the oracle.soa.bpel Logger. If you would choose to use another logger, you would need to change the BASE_PACKAGE variable in the class.

Make sure it has a severity or Log Level low enough to cater for your logging. Set it to the Runtime Logger, but for persistence purpose you probably would need to add it to the "Loggers with Persistent Log Level State". For changing the Runtime logger, you would not need to restart the server. You do need to make sure that the "minimum severity to log" on the server in the WebLogic console.

Before you test, it can be handy to "tail" the diagnostic log as follows:

[oracle@ol7vm logs]$ tail -f DefaultServer-diagnostic.log |grep oracle.soa.bpel

I added my Demo BPEL process also to GitHub. If you test it, the output will be as follows:


So that works! Easy, right?

Now, this works for one simple Log in a BPEL process. But what about if you want to trace the flow using multiple Logs. And maybe even, in fault handlers log particular errors. The scope I introduced can be converted to a subProcess:


 I renamed the SubProcess to Log and then you can remove the Assign:


The scope is replaced with a call activity, that can be renamed. The scope variables now function as call arguments:

You can copy&paste this and rename it to reflect for instance a LogEnd activity:


Testing this, gives the following output:

As can be seen, now a simple log is done using a simple call activity. In this example the Log subprocess is within the same BPEL process, so you could move the setting of the componentName and compositeName variables in an assign in the subProcess, re-enstating the original assign.

However, you could of course move the Embedded Subprocess to a Reusable Subprocess. And then it might be usefull to be able to provide at least the componentName as an argument.

I think it is not so useful to put it in a separate BPEL process that can be called from external composites. In that case you would need to do an invoke with an accompanying assign and variable declarations for each Logging. So I would prefer to define either an embedded or a reusable subprocess for each composite/bpel that you want to do logging in.

Although I experience this article a few years late, I hope it does help.

Friday, 25 September 2020

My boxes in the Vagrant Cloud

Last year I wrote about how I created a seemless desktop using Vagrant, VirtualBox en MobaXterm.

This week I was busy creating a new box with Oracle Linux, later switching to CentOS and installing several IDE's in it. And Docker.

Next week a big change is due for me. And for that I'll be going to switch laptops. Also others will going to use my vagrant project. Up till now I used local file based boxes. So if you wanted to use my projects that I posted on GitHub, you had not only to have the install binaries in a certain folder structure, but also the particular box downloaded in the particular boxes folder. 

This morning I decided to figure out how to publish them on the Vagrant cloud. And it is surprisingly easy, of course! Why I didn't do that before? Well, actually, I started with this by preparing a workshop for colleagues. And to simultaneously download the same box by every participant, did not seem a good idea. So I distributed the vagrant project with all the installers including the box on a stick.

But now, preparing for my laptop switch and distributing it for my colleagues, it seems a good idea.

I found this step by step article that guided me through the process. But let me go through the process my self.

First you'll need an account on the Vagrant Cloud. You can get there from the main page of vagrantup.com. And then click on the Find Boxes button:


Create a new account or login, if not already done that.

You'll land on the Search page:


There you can search for existing boxes. But to create and upload your own one, click on the Dashboard tab:

There click the "New Vagrant Box" button:


Here give the box a name and a short description. My first boxes had a version number in the name. But I found that a bit overdone, because later on you get to define a box versions. Click on the Create box button. I would urge you to provide a description that give some base, identifiable information on the box.


Provide a version, it's smart to start with 1 (it will check it), and possibly a description. Although I find a good base description important, I'm not sure what to write on a first version as a description. For subsequent versions, it seems a good to fill in as well. Like with GitHub/Subversion commit messages.

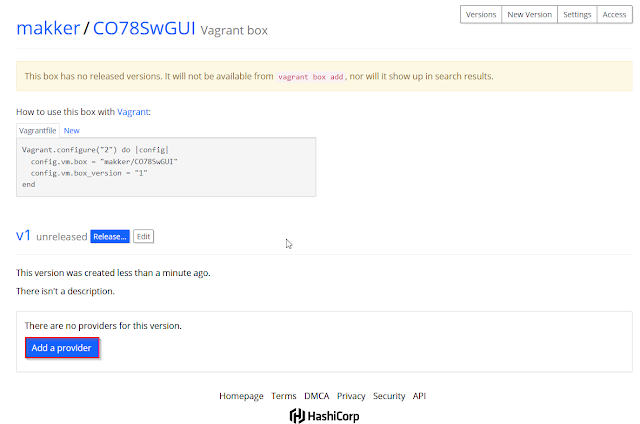
 Within the version, I was looking for an upload button, but you first get to define a provider. So click on the provider button:


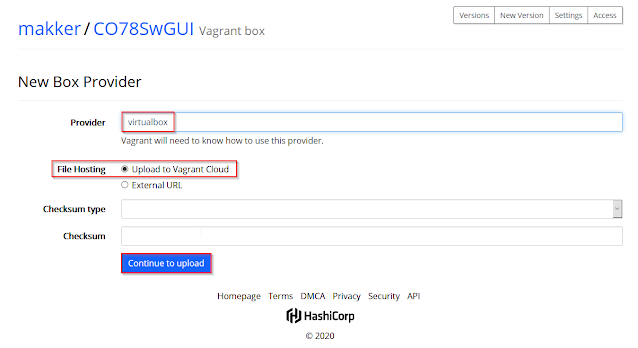
In the following page you get to define a provider. Provide virtualbox as a provider name. Vagrant need to be able to recognize and use that. But there is no poplist, so just a free text field.

I want to upload to the Vagrant Cloud, so the default will suffice. Click on the Continue to upload button:

Using the Browse button, browse to your Vagrant box and have it upload it.

Now, to be able to use the box, and others to discover your box, you'll need to release it. So go to the versions sub tab, and click on the Release button for the v1 version:


In the following page, click on the release button:

Now my boxes are searchable:


To use a box, you can create a Vagrant file with the following reference to the box:


Or create a new box in a new folder using a command like vagrant init makker/CO78SwGUI --box-version 1, continued by vagrant up:

d:\Projects\vagrant\co78>vagrant init makker/CO78SwGUI --box-version 1
A `Vagrantfile` has been placed in this directory. You are now
ready to `vagrant up` your first virtual environment! Please read
the comments in the Vagrantfile as well as documentation on
`vagrantup.com` for more information on using Vagrant.

d:\Projects\vagrant\co78>vagrant up
Bringing machine 'default' up with 'virtualbox' provider...
==> default: Box 'makker/CO78SwGUI' could not be found. Attempting to find and install...
    default: Box Provider: virtualbox
    default: Box Version: 1
==> default: Loading metadata for box 'makker/CO78SwGUI'
    default: URL: https://vagrantcloud.com/makker/CO78SwGUI
==> default: Adding box 'makker/CO78SwGUI' (v1) for provider: virtualbox
    default: Downloading: https://vagrantcloud.com/makker/boxes/CO78SwGUI/versions/1/providers/virtualbox.box

==> default: Waiting for cleanup before exiting...
Download redirected to host: vagrantcloud-files-production.s3.amazonaws.com

You can list boxes with the (sub)command vagrant box list:

d:\Projects\vagrant\co78>vagrant box list
CO77GUIv1.1          (virtualbox, 0)
makker/ol77SwGUIv1.1 (virtualbox, 1)

Remove a box with vagrant box remove CO77GUIv1.1:

d:\Projects\vagrant\co78>vagrant box remove CO77GUIv1.1
Box 'CO77GUIv1.1' (v0) with provider 'virtualbox' appears
to still be in use by at least one Vagrant environment. Removing
the box could corrupt the environment. We recommend destroying
these environments first:

rhfuse (ID: ca219fa1fe0b4984bf77aa7807c0feb2)

Are you sure you want to remove this box? [y/N] y
Removing box 'CO77GUIv1.1' (v0) with provider 'virtualbox'...

But you can add the freshly created box also using the vagrant box add command:

d:\Projects\vagrant\co78>vagrant box add makker/CO78SwGUI --box-version 1
==> box: Loading metadata for box 'makker/CO78SwGUI'
    box: URL: https://vagrantcloud.com/makker/CO78SwGUI
==> box: Adding box 'makker/CO78SwGUI' (v1) for provider: virtualbox
    box: Downloading: https://vagrantcloud.com/makker/boxes/CO78SwGUI/versions/1/providers/virtualbox.box
==> box: Box download is resuming from prior download progress
Download redirected to host: vagrantcloud-files-production.s3.amazonaws.com
Progress: 3% (Rate: 10.5M/s, Estimated time remaining: 0:03:29)

As can be seen it mentions that it started the download earlier, but I broke it off. It apparently resumes the download.

My current Vagrantfiles have the following declaration of the vagrant box:

...
BOX_NAME="CO78GUIv1.1"
BOX_URL="file://../boxes/CO78SwGUIv1.0.box"
VM_MEMORY = 12288 # 12*1024 MB
...
Vagrant.configure("2") do |config|
  # The most common configuration options are documented and commented below.
  # For a complete reference, please see the online documentation at
  # https://docs.vagrantup.com.

  # Every Vagrant development environment requires a box. You can search for
  # boxes at https://vagrantcloud.com/search.
  config.vm.box=BOX_NAME
  config.vm.box_url=BOX_URL
  config.vm.hostname=VM_HOST_NAME
  config.vm.define VM_MACHINE
  config.vm.provider :virtualbox do |vb|
    vb.name=VM_NAME
    vb.gui=VM_GUI
    vb.memory=VM_MEMORY
    vb.cpus=VM_CPUS
...

Based on the suggestion of the Vagrant Cloud:


I adapted this as follows:

...
BOX_NAME="makker/CO78SwGUI"
BOX_VERSION = "1"
#BOX_URL="file://../boxes/CO78SwGUIv1.0.box"
VM_MEMORY = 12288 # 12*1024 MB
...
Vagrant.configure("2") do |config|
  # The most common configuration options are documented and commented below.
  # For a complete reference, please see the online documentation at
  # https://docs.vagrantup.com.

  # Every Vagrant development environment requires a box. You can search for
  # boxes at https://vagrantcloud.com/search.
  config.vm.box = BOX_NAME
  config.vm.box_version = BOX_VERSION
  # config.vm.box_url=BOX_URL
  config.vm.hostname=VM_HOST_NAME
  config.vm.define VM_MACHINE
  config.vm.provider :virtualbox do |vb|
    vb.name=VM_NAME
    vb.gui=VM_GUI
    vb.memory=VM_MEMORY
  vb.cpus=VM_CPUS
...

I uncommented the BOX_URL variable with the config.vm.box_url lines. And added the BOX_VERSION and config.vm.box_version lines. Most importantly I changed the BOX_NAME variable to makker/CO78SwGUI.

These suggestions will download my Cloud boxes without me needing to distributed them separately.

Happy Upping!


Tuesday, 8 September 2020

Silent install of SQL Developer

Last week I provided a script to automatically install the SOA or BPM Quickstart.

Today, below I'll provide a script to install SQL Developer on Windows. I always use the "zip-with-no-jre" file. Therefor installing it is simply unzipping it.

For unzipping, I use the java jar tool This is convenient, because if you want use SQL Developer you need a JDK (unless you choose to use the installer with jre). And if you have a jdk, you have the jar tool. The script mentioned in the previous article, takes care of installing java. So, if you want to do that as well, you could add it to this script.

One disadvantage of the jar  tool is that it can't unzip to a certain folder other than the current folder. So you have to CD to the folder into which you want to unzip it. The script therefor saves the current folder, and CD's to the unzip folder. After installation it CD's back.

The script unzips into the a subfolder, under C:\Oracle\SQLDeveloper. I like to keep my Oracle IDE's together, but grouped. Within the zip file there is a sqldeveloper folder, which is renamed to the name of the zip.

With SQLDeveloper 20.2 I found that it required the msvcr100.dll in the $JDK\jre\bin folder. Apparently in the latest JDK 8 update (261), that I used when creating this script, it wasn't. I found it in c:\Windows\System32 on my system, so I copied it from there to the $JDK\jre\bin folder. But a colleague didn't find it.

Another step in the script is that it copies the a copy of the UserSnippets.xml file. At my customer I created several handy maintenance queries that I saved as snippets. When you do so, you find those saved into the UserSnippets.xml file in the %USERPROFILE%\AppData\Roaming\SQL Developer. Where the %USERPROFILE% usually points to the C:\users\%{your windows username} folder.

If you want to share a copy of that to the users installing the tool using this script, you can save it in the same folder as this script. We keep it in SVN.

@echo off
set CMD_LOC=%~dp0
set CURRENT_DIR=%CD%
SETLOCAL
set SOFTWARE_HOME=x:\SOFTWARE\Software
set SQLDEV_INSTALL_HOME=%SOFTWARE_HOME%\SQL Developer
set SQLDEV_NAME=sqldeveloper-20.2.0.175.1842-no-jre
set SQLDEV_ZIP=%SQLDEV_INSTALL_HOME%\%SQLDEV_NAME%.zip
set SQLDEV_BASE=c:\Oracle\SQLDeveloper
set SQLDEV_HOME=%SQLDEV_BASE%\%SQLDEV_NAME%
set SQLDEV_USERDIR=%USERPROFILE%\AppData\Roaming\SQL Developer
set CMD_LIB=%CMD_LOC%\ext
rem Install SqlDeveloper
if not exist "%SQLDEV_HOME%" (
  echo SqlDeveloper does not yet exist in "%SQLDEV_HOME%".
  if exist "%SQLDEV_ZIP%" (
    echo Install SqlDeveloper in %SQLDEV_HOME%.
    if not exist "%SQLDEV_BASE%" (
      echo Create folder %SQLDEV_BASE%
      mkdir %SQLDEV_BASE%
    )
    cd %SQLDEV_BASE%
    echo Unzip SqlDeveloper "%SQLDEV_ZIP%" into %SQLDEV_BASE%
    "%JAVA_HOME%"\bin\jar.exe -xf "%SQLDEV_ZIP%"
    echo Rename unzipped folder "sqldeveloper" to %SQLDEV_NAME%
    rename sqldeveloper %SQLDEV_NAME%
    rem Deze library wordt verwacht in de Java home, maar komt blijkbaar niet meer standaard mee. 
    if not exist "%JAVA_HOME%\jre\bin\msvcr100.dll" (
      echo Copy msvcr100.dll from c:\Windows\System32\ to "%JAVA_HOME%\jre\bin"
      copy c:\Windows\System32\msvcr100.dll "%JAVA_HOME%\jre\bin"
    ) else (
      echo Library "%JAVA_HOME%\jre\bin\msvcr100.dll" already exists.
    )
    if not exist "%SQLDEV_USERDIR%" (
      echo Create folder "%SQLDEV_USERDIR%"
      mkdir "%SQLDEV_USERDIR%"
    )
    if not exist "%SQLDEV_USERDIR%\UserSnippets.xml" (
      echo Copy "%CMD_LOC%\UserSnippets.xml" naar "%SQLDEV_USERDIR%"
      copy "%CMD_LOC%\UserSnippets.xml" "%SQLDEV_USERDIR%" /Y
    ) else (
      echo User Snippets "%SQLDEV_USERDIR%\UserSnippets.xml" already exists.
    )
    cd %CURRENT_DIR%
  ) else (
    echo SqlDeveloper zip  "%SQLDEV_ZIP%" does not exist!
  )
) else (
  echo SqlDeveloper already installed in %SQLDEV_HOME%.
)
echo Done.
ENDLOCAL

Update 2020-09-09: in the line with mkdir "%SQLDEV_USERDIR%", there should be quotes around the folder, since there is a space in it.
The folder structure "%USERPROFILE%\AppData\Roaming\SQL Developer" is taken from an existing installation. This is where SQLDeveloper expects the user data.