Friday 28 November 2008

Home page in a JHeadstart application

This week I finished a JHeadstart generated application. Indeed I found that using JHeadstart, espessially because of the Velocity Templating framework, you get about the same productivity of Oracle Designer.

When you generate an application using JHeadstart, it generates also a Home.jspx for you. If you use this Home.jspx as your landing page (because after logging in by default you "land" on this page) you find that it lacks a menu. And maybe you want some other elements on this page. Of course you can edit the generated Home.jspx, adding the menu-facet and the other elements. But I found that sometimes JHeadstart regenerates the Home page.
If you use Subversion (or another version control system) and had committed your Homepage then you can reset your Home page back from your repository. But certainly I forget this 3 out of 4 times.

So I thought: lets generate the home page together with the other screens.

To do that you have to create another group in the application service with the JHeadstart Application Definition Editor. Call it the Home group.
Uncheck the 'Bound to Model Data collection'. Of course you do not have to choose a Data Collection.

As a layout style choose: Form.
Set the search settings both on false.
As tab-name I would choose "Home".
For a display title you can choose: "Welcome #{jhsUser!=null ? jhsUser.displayName : facesContext.externalContext.userPrincipal.name} to the Service Oriented Scheduler Maintenance Application!". In fact I copied this from the original generated home page. Of course I gave onather application name (it used to be "JHeadstart demo application").

Under Operations uncheck every DML operation.

Since there is already a "Home" button in the Global Menu, I do not want to have the Home page in the application menu. So I unchecked "Add Menu entry for this Group" under Customization Settings.

For a Group it is mandatory to have a Descriptor Item. But I did not want any items on my page. So what I did was to create one item, called "Home" (or what ever you like).


Uncheck "Bound to Model attribute?".
As a Java Type, I choose "String" (but that does not do anything) and as a display type "Hidden". Furthermore I set the Display properties all on False, and unchecked the Search options. But since I had a hidden field, these options might do nothing. I did not check.

Now if I did not forget to mention anything, the home page is generated for you, as you like, with the proper menu. You can adapt it to your wishes by adding other elements as Items (like an image for instance).

And here is my Do It Yourself-Home-page:


Deployment of Java ADF applications to Oracle 10.1.3 Application Server

In my current project I created a Java ADF 10.1.3.3 application. Actually I generated the whole bunch with JHeadstart 10.1.3.3. Pretty cool stuff actually.
At the end I had to deploy the application to a proper application server. That is: not the embedded OC4J in JDeveloper, but in my case the Oracle 10.1.3.3 application server that runs our SoaSuite.
And I couldn't find a proper document that tells me how to do that. With some searching around, and "with a little help of my friends", I found three documents:
The first one tells you how to setup your deployment descriptors. It will give you at the end an EAR file that you can use to deploy to an J2EE application server.

But by default JDeveloper ships all your connections in the connection navigator in the model-project's JAR file. And also by default it deploys with a connection-descriptor in the JAR file with the database-connection you used at development time. This is of course not usefull when you deploy the EAR file to a test, acceptance or Production environment. The second post, by Pascal Alma, solves these things.

The last link points to the adf-developers guide where is stated how to change the model-project to use a datasource instead of a fixed JDBC-url.

Below I created a step by step guide to prepare for the proper deployment. For creating the actual deployment profiles I refer to the first link above.

Disable deployment of Jdeveloper Connections.
To disable this feature:
  1. Go to the jDeveloper Preferences.

  2. Go to the Deployment node and disable the checkbox “Bundle Default data-sources.xml During Deployment”.

Change Application Module to use Datasources
  1. Right click on the Application Module and choose Configurations


  2. Click on the Edit button

  3. Set Connection Type.
    Set connection Type on “JDBC DataSource” and name the Datasource something like jdbc/FDS.

  4. Click on OK.

Now you can create a deployment just following the steps on: http://www.oracle.com/technology/obe/obe1013jdev/10131/deployment/deployment.htm.
Having done that, you can create an EAR file by right-clicking on the deployment profile in the deployment project. And choose EAR-File:

This will create an EAR file in the deploy folder of the project. This file can then be used to deploy to the Application Server. This is quite easily done in the Application Server Control application (http://<applicationserverhost:port>/em). I might write an separate article about that later.

After that you need to create a datasource in the application-server. How to do that is a pretty straightforward task usually done by an Application Server Administrator. But I probably write a separate article about that another time too.

I hope this helps preventing you for searching around as long as I did. If you were searching already for about a day, I'm sorry you did not find me earlier...

Tuesday 25 November 2008

alternative quoting mechanism

As said in my previous post a teached a course about sql and plsql 10gR2.
One of the topics was the alternative quoting mechanism introduced in Oracle 10g.

The code you had to write in previous versions was sometimes very unreadable.
See the two examples below:

Example 1:


Example 2:


In Oracle 10g you cab define your own delimiter.
The rule is as follows:
start with q' followed by an unique character string end with the same unique character.

Some examples


However there are some (documented) exceptions. The ( and [ !
Here you have to close with respectively ) and ]...
I personally do not like this kind of exceptions.
The alternative quoting mechanism however is something I do like. It makes the code easier to write and makes it more readable which means that is easier to maintain as well.

Thursday 20 November 2008

Group by rollup

This week I teached a course about the Do's and Don'ts in Oracle 10gR2 (SQL and PL/SQL) I had a room full of experienced Oracle Oracle 7 and Oracle 8 programmers.

I talked about grouping and the rollup function in SQL.
One of the questions was: How can we use the grouping totals in our reporting tool.

A solution:

Let's look at the salaries per job per department in our emp table:


What if I want the following results in a report:
- How much do all SALESMAN earn in department 30?
- How much do all employees earn in total?
By using rollup in combination with the grouping function we came up with the following query

This query results in the following output: Note the grouping function.
It shows the level of the group by
0: No grouping at this level
1: Grouping on this level

Now we can anwer the questions.
- How much do all SALESMAN earn in department 30? Answer: 5600
- How much do all employees earn in total? Answer: 27725

How can I refer to the (grouping) results in a report.

You could create a nested query or a view:

Now you can base your report on this query.

or


Note: I did some updates on the original emp-table...

Friday 7 November 2008

Wireless Network bridging with VMware Server 1.0.7

VMware Server works very fine under OpenSuse 10 and 11. In fact, it is one of the reasons I turned to OpenSuse. But I couldn't get my wireless adapter (wlan0) working with bridged networks. So if I wanted to have my VM's bridged I was restricted to the wired-adapter (eth0).

I've searched and searched both in Google and the OpenSuse Forums. Many people struggled with the same issue, but I couldn't find any solution. Until today. It started by finding this article: http://www.hauke-m.de/artikel/vm-ware-wlan-bugfix/ It's in german, but it has an English translation too.

What it suggests is that there is a bug in the vmnet that Hauke solved. You can download his, replace your vmnet.tar that resides in /usr/lib/vmware/modules/source/ with it.
Then after running vmware-config.pl it s
hould work.

Apparently the vmnet.tar is from vmware-player 2.0 which does support kernels with a version higher then
2.6.21.

However, things often are a little more complicate than simple. In my case the kernel is 2.6.25. And I ran into compilation errors. First I ran into:

CC [M] /tmp/vmware-config1/vmnet-only/driver.o In file included from /tmp/vmware-config1/vmnet-only/compat_sock.h:5, from /tmp/vmware-config1/vmnet-only/driver.c:29: /usr/src/linux-2.6.25.18-0.2/include/net/sock.h: In function ‘sock_valbool_flag’: /usr/src/linux-2.6.25.18-0.2/include/net/sock.h:106: error: implicit declaration of function ‘sock_set_flag’ /usr/src/linux-2.6.25.18-0.2/include/net/sock.h:108: error: implicit declaration of function ‘sock_reset_flag’ /usr/src/linux-2.6.25.18-0.2/include/net/sock.h: At top level: /usr/src/linux-2.6.25.18-0.2/include/net/sock.h:431: warning: conflicting types for ‘sock_set_flag’ /usr/src/linux-2.6.25.18-0.2/include/net/sock.h:431: error: static declaration of ‘sock_set_flag’ follows non-static declaration /usr/src/linux-2.6.25.18-0.2/include/net/sock.h:106: error: previous implicit declaration of ‘sock_set_flag’ was here /usr/src/linux-2.6.25.18-0.2/include/net/sock.h:436: warning: conflicting types for ‘sock_reset_flag’ /usr/src/linux-2.6.25.18-0.2/include/net/sock.h:436: error: static declaration of ‘sock_reset_flag’ follows non-static declaration /usr/src/linux-2.6.25.18-0.2/include/net/sock.h:108: error: previous implicit declaration of ‘sock_reset_flag’ was here

I found a solution for this at: http://www.tfug.org/pipermail/tfug/2008-April/018337.html
However, it does not state precise enough where to do the change. Luckily I found that.
Open /usr/src/linux/include/net/sock.h in vi (as root).
Search for the line: extern __u32 sysctl_wmem_max;
Right above it copy the following lines:

static inline void sock_valbool_flag(struct sock *sk, int bit, int valbool)
{
if (valbool)

sock_set_flag(sk, bit);
else
sock_reset_flag(sk, bit);
}


So that it reads:

(it's allways wise to first backup the file to for example sock.h.org).
Then running vmware-config.pl again got me into the following compilation errors:
make -C /usr/src/linux-2.6.25.18-0.2 O=/usr/src/linux-2.6.25.18-0.2-obj/x86_64/default/. modules
CC [M] /tmp/vmware-config2/vmnet-only/driver.o
CC [M] /tmp/vmware-config2/vmnet-only/hub.o
CC [M] /tmp/vmware-config2/vmnet-only/userif.o
CC [M] /tmp/vmware-config2/vmnet-only/netif.o
CC [M] /tmp/vmware-config2/vmnet-only/bridge.o
CC [M] /tmp/vmware-config2/vmnet-only/filter.o
/tmp/vmware-config2/vmnet-only/filter.c:48: error: ‘NF_IP_LOCAL_IN’ undeclared here (not in a function)
/tmp/vmware-config2/vmnet-only/filter.c:53: error: ‘NF_IP_POST_ROUTING’ undeclared here (not in a function)
/tmp/vmware-config2/vmnet-only/filter.c: In function ‘VNetFilterHookFn’:
/tmp/vmware-config2/vmnet-only/filter.c:233: warning: comparison between pointer and integer
make[4]: *** [/tmp/vmware-config2/vmnet-only/filter.o] Error 1
make[3]: *** [_module_/tmp/vmware-config2/vmnet-only] Error 2
make[2]: *** [sub-make] Error 2
make[1]: *** [all] Error 2

This is also solved using the http://www.tfug.org/pipermail/tfug/2008-April/018337.html.
In the vmnet.tar there is a c-file: vmnet-only/filter.c.
In that file search and replace NF_IP_LOCAL_IN with 1 and NF_IP_POST_ROUTING with 4. These values were found in:/usr/src/linux/include/linux/netfilter_ipv4.h.
Then copy filter.c back into vmnet.tar. Or just use mine here.

Then copy the changed vmnet.tar into /usr/lib/vmware/modules/source/.
In my case with running vmware-config.pl the last time it compiled vmnet neatly.
And now my windows-guest bridged over wireless!

Thanks to the guys behind the links, you've made my ICT-life a little more convenient.

And you guys: don't forget to come here again after the next kernel update (since the socks.h file might break again).

Wednesday 5 November 2008

Attachments with Integration B2B

In Integration B2B, escpecially with the ebXML adapter, you can send multiple attachments.

Attachments can be of any type, both binaries as well as ASCII-files. There can be multiple files that will be send together with a payload. The payload however is mandatory, so you
can't just send a message with attachments, but without a payload.

To send attachments you have to make-up an attachment-xml document with the following structure:
<?xml version="1.0" encoding="UTF-8"?>
<!--Sample XML file generated by XMLSpy v2005 sp1 U (http://www.xmlspy.com)-->
<Attachments xmlns:xsi="http://www.w3.org/2001/XMLSchema-instance" version="1.0" boundary="boundary---">
<AttachmentPart>
<Location>file:/C:/ebmsTests/cleo/binaryPayload.jpg</Location>
<Content-Type>
<Top-Level-Type>image</Top-Level-Type>
<Sub-Type>jpeg</Sub-Type>
</Content-Type>
</AttachmentPart>
</Attachments>

As you can see there can be several attachment-parts. The attachment-part as shown can have a location-element in which you provide a valid url to the particular file. It can also have an element with the content Base64-encoded. This is particular the case when receiving attachment while B2B is not directed to put the received attachments in a file-folder.

To be able to send files with a particular mimetype, you have to set a property in the tip.properties file:

oracle.tip.adapter.b2b.MimeType=application/xml : application/octet-stream : application/EDIFACT : application/EDI-X12 : application/jpg : image/jpeg : application/gzip : application/x-gzip : application/pkcs7-signature : application/pdf

Here you can add additional mime-types you need. It appears that B2B has a quite limited standard list.

Another important property is the following:
oracle.tip.adapter.b2b.attachments.dir=/mnt/hgfs/stage/nllvm12-cjib/attachments

Here you can denote where B2B has to put the received attachments. On receive of the message it will place the file there and in the attachment.xml document in the ip-message-type it will denote which attachments it received.

If you do not give up a directory then it will put the received attachments Base64-encoded in the attachment.xml in the ip-message-type on the queue.

Dynamic Partnerlinks made simple

Introduction

BPEL Process Manager is made to orchestrate services. It's a good tool to sequence the handling of services into a Business Process. In most cases it is evident which services you need to invoke at runtime. But there are cases that you want to be able to choose dynamically which process you want to call. For instance when you want to call services based on the content of a datamodel. You might have services with about the same purpose but with a difference based on a preference. For instance in a certain case different tasks have to be invoked and which specific task in which case is registered in a database. Possibly the task-definitions can be extended with extra tasks.

You can do this in the Oracle BPEL Process Manager using Dynamic Partnerlinks. On OTN you can find the BPEL Cookbook which handles this subject. In the Cookbook-case the writer starts from the Orderbooking Tutorial, where you can do a loan-request to
different loan providers. The idea is then that you might want to add loan-providers without changing your process. However, I found that this article is quite complicated and at least pretty complicated to translate into a particular situation.

But a Dynamic Partnerlink solution turns out to be quite easy to implement. In this article I'll tell you how.

Prerequisites

There are a few prerequisites, actually there is one major prerequisite. And that is that every process that you want to call has to be based on exactly the same WSDL. Not just the request and response documents based on a prescribed XSD. But the WSDL has to be literally the same. The message types, the namespaces, port types, bindings. Actually the only thing that at deployment will differ is the endpoint-url.

People that have experience in Oracle Workflow calling custom pl/sql workflow functions (standalone or the OWF embedded in E-BusinessSuite), rule-functions in OWF Business Event System or Oracle Streams Advanced Queueing's pl/sql call-back notification functions, may understand the importance of this prerequisite. Java Programmers can see this as implementing an interface-class.

Then there 3 things to do:

  1. Create a “template” process, or just the first process of a set that have to be called;

  2. Create the calling process, with a partnerlink based on the template process and an initialize-and-invocation-sequence;

  3. Create additional processes.

The template process

The template process you can build exactly the same as any other process. Keep the following things in mind:
  1. Create request and response documents that adapt to the need of every possible service that you want to be able to call. The request document need to give enough information for each service to find out what it needs to do. With the response
    document each process need to be able to pass all the relevant information for the calling process to act upon.

  2. Create a separate XSD for the request and response document and put it on a http-server (for instance the document-root on the Oracle HTTP Server of the SoaSuite. It's not recommended to use the xmllib folder of the BPEL process manager for it. This might bring up complications at activating bpel-processes
    at start-up.

  3. Think of a smart generic name for the service. Since each other process/service need to be based on the exact wsdl, the messagetypes, porttypes, etc. need to have a naming
    that resembles a valid function within each other process.

  4. Since each process will have the same WSDL think an extra time about if it has to be a synchronous or asynchronous service.

After creation of the template process, deploy it to the development server. At that time the WSDL is adapted with the particular endpoint.

Creating the Invocation Process

The invocation process is created as another BPEL process.

First step is to create a partnerlink. This partnerlink should be based on the template process that is deployed to the development server.

Then add the following namespace to your bpel process:

xmlns:wsa="http://schemas.xmlsoap.org/ws/2003/03/addressing"

Based on this namespace, add an “EndpointReference” variable:

<variable name="partnerReference" element="wsa:EndpointReference"> </variable>


This variable need to be initialized. On contrary to the BPEL Cookbook you only need to initialize the “address” node. If you don't initialize it or if you initialize also the service node you might run into a java null-pointer exception. At least I did.
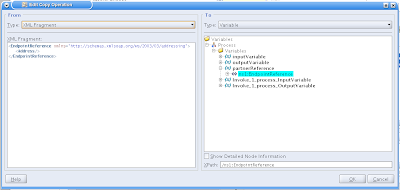
You initialize the endpoint-reference by copying the following xml-fragment to the endpoint reference:

<EndpointReference
xmlns="http://schemas.xmlsoap.org/ws/2003/03/addressing">
<Address/>
</EndpointReference>


In Jdeveloper this looks like:
Then you copy the determined endpoint url into the address node of the EndpointReference variable:

<copy>
<from
expression='ora:getPreference("EndPoint")'/>
<to variable="partnerReference"
query="/wsa:EndpointReference/wsa:Address"/>
</copy>

In JDeveloper this looks like:

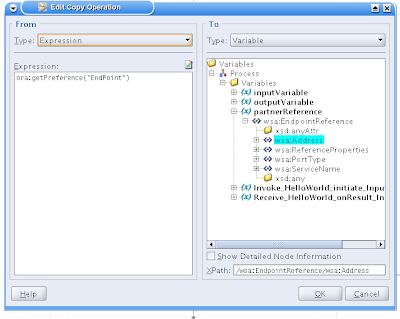
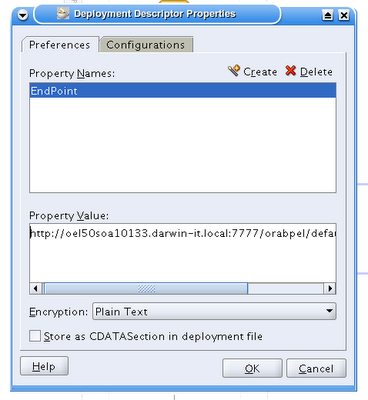
In this case I get the address from a preference from the deployment descriptor.

The actual address can be determined from the WSDL as it is deployed on the server, In my
case:

<service name="HelloWorldEN">
<port name="HelloWorldENPort"
binding="tns:HelloWorldENBinding">
<soap:address location="http://oel50soa10133.darwin-it.local:7777/orabpel/default/HelloWorldEN/1.0"/>
</port>
</service>


The content of the location attribute of the soap:address node is the url that has to becopied into the endpoint-reference variable. In this example it is put it in the EndPoint deployment preference:
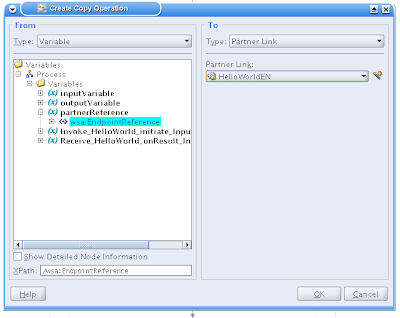
Having done that, you'll need a partnerlink to the template project. An invoke activity (and with asynchtonous processes a receive activity). Then before doing the invoke you need to copy the Endpoint Reference to the partnerlink:

<copy>
<from variable="partnerReference" query="/wsa:EndpointReference"/>
<to partnerLink="HelloWorldEN"/>
</copy>


And that's about it. You can deploy this and see if it works, by starting the process and then doing the test again with a “wrecked” end-point url. If the url is broken, the invoke shoul turn into an error.

Create additional processes

The next thing to do is to create additional services, based on the same WSDL. For BPEL you'll have to create another BPEL Project. Then perform the following steps:

Copy WSDL

Take the WSDL of the template project and copy and paste it over the WSDL of your newly created BPEL project.

Mark that in the old situation the definitions tag of your newly created BPEL project looks like:

<definitions name="HelloWorldNL"
targetNamespace="http://xmlns.oracle.com/HelloWorldNL"
xmlns="http://schemas.xmlsoap.org/wsdl/"
xmlns:client="http://xmlns.oracle.com/HelloWorldNL"
xmlns:plnk="http://schemas.xmlsoap.org/ws/2003/05/partner-link/">


After pasting the content of the template-WSDL over it, it will look like:

<definitions name="HelloWorldEN"
targetNamespace="http://xmlns.oracle.com/HelloWorldEN"
xmlns="http://schemas.xmlsoap.org/wsdl/"
xmlns:client="http://xmlns.oracle.com/HelloWorldEN"
xmlns:plnk="http://schemas.xmlsoap.org/ws/2003/05/partner-link/">


Change the Namespaces of your BPEL process

Open the bpel process source (in JDeveloper click on the Source tab). The namespaces on top are:

<process name="HelloWorldNL"
targetNamespace="http://xmlns.oracle.com/HelloWorldNL"
xmlns="http://schemas.xmlsoap.org/ws/2003/03/business-process/"
xmlns:client="http://xmlns.oracle.com/HelloWorldNL"
xmlns:ora="http://schemas.oracle.com/xpath/extension"
xmlns:orcl="http://www.oracle.com/XSL/Transform/java/oracle.tip.pc.services.functions.ExtFunc"
xmlns:xp20="http://www.oracle.com/XSL/Transform/java/oracle.tip.pc.services.functions.Xpath20"
xmlns:ldap="http://schemas.oracle.com/xpath/extension/ldap"
xmlns:bpelx="http://schemas.oracle.com/bpel/extension"
xmlns:bpws="http://schemas.xmlsoap.org/ws/2003/03/business-process/">

Change the client and the target namespace to the namespaces matching with
the WSDL:

<process name="HelloWorldNL"
targetNamespace="http://xmlns.oracle.com/HelloWorldEN"
xmlns="http://schemas.xmlsoap.org/ws/2003/03/business-process/"
xmlns:client="http://xmlns.oracle.com/HelloWorldEN"
xmlns:ora="http://schemas.oracle.com/xpath/extension"
xmlns:orcl="http://www.oracle.com/XSL/Transform/java/oracle.tip.pc.services.functions.ExtFunc"
xmlns:xp20="http://www.oracle.com/XSL/Transform/java/oracle.tip.pc.services.functions.Xpath20"
xmlns:ldap="http://schemas.oracle.com/xpath/extension/ldap"
xmlns:bpelx="http://schemas.oracle.com/bpel/extension"
xmlns:bpws="http://schemas.xmlsoap.org/ws/2003/03/business-process/">


Changing the port types
The port types have to be changed also. The port types are referenced in the invoke and the receive steps.

<!-- Receive input from requestor. (Note: This maps to operation defined in HelloWorldNL.wsdl) -->
<receive name="receiveInput" partnerLink="client" portType="client:HelloWorldNL" operation="initiate" variable="inputVariable" createInstance="yes"/>
<!-- Asynchronous callback to the requester. (Note: the callback location and correlation id is transparently handled using WS-addressing.) -->
<invoke name="callbackClient" partnerLink="client" portType="client:HelloWorldNLCallback" operation="onResult" inputVariable="outputVariable"/>


Change the portType-attributes according to the portType name-attributes in the WSDL:

<sequence name="main">
<!-- Receive input from requestor. (Note: This maps to operation defined in elloWorldNL.wsdl) -->
<receive name="receiveInput" partnerLink="client" portType="client:HelloWorldEN"
operation="initiate" variable="inputVariable" createInstance="yes"/>
<!-- Asynchronous callback to the requester. (Note: the callback location and correlation id is transparently handled using WS-addressing.) -->
<invoke name="callbackClient" partnerLink="client" portType="client:HelloWorldENCallback"
operation="onResult" inputVariable="outputVariable"/>
</sequence>

Partnerlink Type and Roles

In the bottom of the WSDL you'll find a partnerlinkType element. It has two roles defined, one for each portType. In the BPEL process source you'll have a client-partnerlink:

<partnerLink name="client" partnerLinkType="client:HelloWorldNL" myRole="HelloWorldNLProvider" partnerRole="HelloWorldNLRequester"/>

Here you'll see also the corresponding type and roles. Change them according to the WSDL:

<partnerLink name="client" partnerLinkType="client:HelloWorldEN" myRole="HelloWorldENProvider" partnerRole="HelloWorldENRequester"/>

Input and Output Variables

The input and output variables of the bpel process are based on the message types in the WSDL.

<variables>
<!-- Reference to the message passed as input during initiation -->
<variable name="inputVariable" messageType="client:HelloWorldNLRequestMessage"/>
<!-- Reference to the message that will be sent back to the requester during callback -->
<variable name="outputVariable" messageType="client:HelloWorldNLResponseMessage"/>
</variables>

Of course these should be changed according to the WSDL too:

<variables>
<!-- Reference to the message passed as input during initiation -->
<variable name="inputVariable" messageType="client:HelloWorldENRequestMessage"/>
<!-- Reference to the message that will be sent back to the requester during callback -->
<variable name="outputVariable" messageType="client:HelloWorldENResponseMessage"/>
</variables>


If the message types in the WSDL are based on local XSD's (with in the project, not on a HTTP-Server) the you have to copy the XSD to your new project too. But I would especially in this case recommend to put the XSD's to a HTTP-Server. In that case a change in the XSD would immediately count for all the processes that are based on them.

Finish/wrap-up

This should be about it. Now you can implement your new BPEL process. Then deploy it and test your dynamic invocation by copying the endpoint of the new BPEL process and register it in your Invocation Process.