Monday 21 September 2009

OPN Bootcamps delivered by Darwin-iT

Tomorrow and wednesday (22nd-23th of september) I deliver the first OPN Bootcamp in De Meern, the Netherlands on Oracle BPM Suite. The course is a two day hands-on workshop on BPM Suite Studio, addressing the basics on developing Business Processes.
There are still seats available so if you would like to join and are in the position to do so then it is still possible. More info on the course is found here.

Other bootcamps in October that will be delivered by us in De Meern are:
There is a "register now" button on the summary-pages of the boot camps.
The bootcamps are also open for foreign partners, that is foreign to the Netherlands.
We're looking forward to meet you on one of these courses. For Dutch potential participants check-out the training pages on our website regularly. More detailed info on these courses and more dates planned are expected soon.

Thursday 17 September 2009

Shortcut to your VM on the desktop

With VMWare Server 2.0 you can start and stop VM's using the VMware Infrastructure Web Access application. This is a replacement of the vmware console in VMWare Server 1.0. The console is now a control in the console tab of the Virtual Machine in the Web Access. You have to click in the black area and the console will pop-up. If you're a user of Vmware Server 2.0 or other similar VMWare apps, you probably already know this.

What I recently found though is the ability to create a short cut on your desktop to a particular VM. This handy because it pops up the console where you can log in with your VMWare Administrator account and then the VM will start. From the console you can also suspend or stop using the Remote/Troubleshoot menu.

To create a shortcut on your desktop goto the summary page of your VM. In the commands portlet you find the "Generate Virtual Machine Shortcut" link:

Follow the instructions and you get an Icon with the shortcut on your desktop.

Tuesday 15 September 2009

I can do WSIF me...

Today I struggled with WSIF using the WSIF-chapter in the BPEL Cookbook.
WSIF stands for Webservice Invocation Framework and is an Apache technology that enables a Java service call to be described in a WSDL (Webservice Definition Language). The WSDL describes how the request and response documents map to the input and output objects of the java-service-call and how the Soap operation binds to the java-method-call.
BPEL Process Manager supports several java-technologies to be called using WSIF. The advantage for using WSIF is that from BPEL perspective it works exactly the same as with Webservices. The functional definition part of the WSDL (the schema’s, message definitions and the ports) are the same. The differences are in the implementation parts. In stead of using SOAP over HTTP the BPEL PM will directly call the java-service. The performance is then about the same as with calling java from embedded java. The BPELP PM has to be able to call the java-libraries. They have to be in the class path.

Altough the chapter "Using WSIF for Integration" from the bpel-cookbook, quite clearly states how to work out the java callout from BPEL, I still ran into some strugglings.

Generating the XML Facades
The BPEL cookbook suggests to use the schemac utility to compile the schema's in the WSDL to the XML Facade classes. The target directory should be <bpelpm_oracle_home>\integration\orabpel\system\classes. I found this not so handy. First of all I don't like to have a bunch of classes in this folder. It tend to get messed up. So I want to get them in a jar file. But I also found that the schemac was not able to compile the classes as such. So I started off by adding two parameters:
C:\DATA\projects\EmailConverter\wsdl>schemac -sourceOut ..\src -noCompile WS_EmailConverter.wsdl
The -sourceOut parameter will take care of creating source files in the denoted folder. The -noCompile folder will cause the utility not to compile the classes.

You could also use the -jar option to jar the compiled classes into a jar-file, what essentially my goal is (but then you should omit the -noCompile option presumably).
Also you could add a -classpath <path> option to denote a classpath.

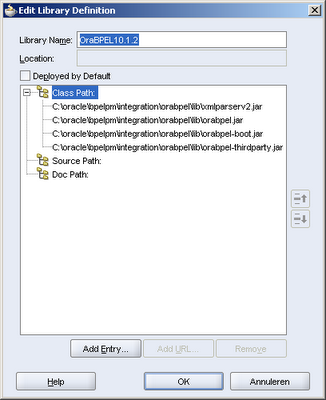
I found that my major problem was that I missed some jar-files. So although I used schemac from the OraBPEL Developer prompt, my classpath was not set properly. Something I did not find in the cookbook. The jar-files you need to succesfully compile the classes are:
  • orabpel.jar
  • orabpel-boot.jar
  • orabpel-thirdparty.jar
  • xmlparserv2.jar
So with this information you could expand the schemac command above to compile the classes into a jar-file.

But the XML Facade classes are to be used in a java implementation class that is to be called from BPEL PM using WSIF. And since it is one project where the facades are strictly for the implementing java class I want them shipped within the same jar file as my custom-code. That way I have to deliver only one jar file to the test and production servers. So I still do not want the schemac utility to compile and jar my XML Facade classes.

To automate this I created an ant file.

Generate the XML Facades using Ant
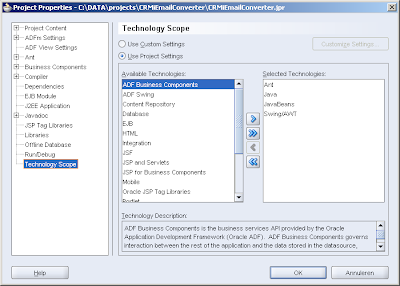
To be able to use ant within your project it is handy to use the ANT technology scope. That way you're able to let JDeveloper generate an Ant-build-file based on your project.
To do so go to the project properties and go to the Technology Scope entry where you can shuttle the Ant scope to the right:


Then it is handy to have a user-library created that contains the OraBPEL libraries needed to compile the XML Facades:

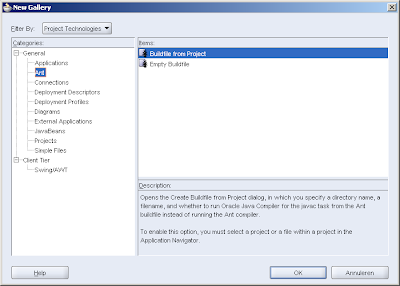
Having done that you can create a build file based on your project that contains amongst others a compile target with the appropriate classpath (including the just created user-libs) set:

Add genFacedes ant targe with the schemac task
To add the genFacades ant target for generating the facades, you have to define the schemac task in the top of your build.xml file:
<taskdef name="schemac" classname="com.collaxa.cube.ant.taskdefs.Schemac"
classpath="${bpel.home}\lib\orabpel-ant.jar"/>

For this to work you have to extend the build.properties with the bpel.home property:
#Tue Sep 15 11:28:59 CEST 2009
javac.debug=on
javac.deprecation=on
javac.nowarn=off
oracle.home=c:/oracle/jdeveloper101340
bpel.home=C:\\oracle\\bpelpm\\integration\\orabpel
app.server.lib=${bpel.home}\\system\\classes
build.home=${basedir}/build
output.dir=${build.home}/classes
build.classes.home=${build.home}/classes
build.jar.home=${build.home}/jar
build.jar.name=${ant.project.name}.jar
build.jar.mainclass=nl.rabobank.crmi.emailconverter.EmailConverter
(I also added some other properties I'll use later on).
Mark that the bpel home (for 10.1.2) is in the "integration\orabpel" sub-folder of the oracle-home.

Having done that, my genFacades target looks like:
<target name="genFacades" description="Generate XML Facade sources">
<echo>First delete the XML Facade sources generated earlier from ${basedir}/src/nl/darwin-it/www/INT </echo>
<mkdir dir="${basedir}/src/nl/darwin-it/www/INT"/>
<delete>
<fileset dir="${basedir}/src/nl/darwin-it/www/INT" includes="**/*"/>
</delete>
<echo>Generate XML Facade sources from ${basedir}\wsdl\INTI_WS_EmailConverter.wsdl to ${basedir}/src</echo>
<schemac input="${basedir}\wsdl\INTI_WS_EmailConverter.wsdl"
sourceout="${basedir}/src" nocompile="true"/>
</target>

This target first creates a directory where the classes are generated into (if it does not exist yet) and then delete files that are generated in that directory within an earlier iteration. This is to cleanup classes that became obsolete because of XSD changes.
Then it does the schemac task that is defined earlier in the project.

Compile and Jar the files
You can now implement your java code as suggested in the BPEL Cookbook. After that you want to compile and jar the project files.
Since we use BPEL 10.1.2 at my current customer (I know it's high time to upgrade, the team is busy with that), I found that the classes were not accepted by the BPEL PM. It lead to an unsupported class version error. BPEL 10.1.2 only supports Java SE 1.4 compiled classes. So I had to adapt my compile target:
<target name="compile" description="Compile Java source files" depends="init">
<echo>Compile Java source files</echo>
<javac destdir="${output.dir}" classpathref="classpath"
debug="${javac.debug}" nowarn="${javac.nowarn}"
deprecation="${javac.deprecation}" encoding="Cp1252" source="1.4"
target="1.4">
<src path="src"/>
</javac>
</target>
Because it is sometimes handy to compile/build within JDeveloper it is safe to also set the java-compile-version properties in the project-properties.

The create-jar and deploy-jar targets look like:
<!-- create Jar -->
<target name="create-jar" description="Create Jar file" depends="compile">
<echo message="Create Jar file"></echo>
<jar destfile="${build.jar.home}/${build.jar.name}" basedir="${output.dir}">
<manifest>
<attribute name="Main-Class" value="${build.jar.mainclass}"/>
</manifest>
</jar>
</target>
<!-- deploy Jar -->
<target name="deploy-jar" description="deploy jar file" depends="create-jar">
<echo message="Deploy Jar file to ${app.server.lib}"></echo>
<copy  todir="${app.server.lib}" file="${build.jar.home}/${build.jar.name}" overwrite="true" />
</target>
So this should work, together with the BPEL Cookbook it resulted in a working integration. And since it is a direct coupling it is pretty fast (although my implementation does not do much yet...

How new is new with Oracle-Sun?

Yesterday I got the announcement of an innovative new product of Oracle with Sun: "Announcing the World’s First OLTP Database Machine with Sun FlashFire Technology".
Immediately I thought: how new? Where did I hear that before? Oh yeah, last year around Open World, the database-machine with HP. I already found the announcement of the Sun-acquisition by Oracle remarkable regarding this database machine. Apparently the new thing is in the Sun FlashFire Technology and that they now specifically talk about OLTP (I can't remember if they named the Oracle-HP Database machine explicitly as such).

Later in the day I also found a declaration that Oracle is fastest on Sun hardware. This was to state that it is serious with Oracle to embrace the Sun technology. "Oracle and Sun together are hard to match." the announcement states. Oracle is going to proof with benchmarks that the world is better off with the Oracle-Sun mariage.

Thursday 10 September 2009

Marketing bleating

In Dutch we have a saying: "tested as the best". It's introduced by the Dutch Consumer Foundation for those products that are found to be the best amongst others in a test. However, litterly the Dutch saying means that they tested it as the best, better then other product-testing-bureau's. I do believe they can test as the best. But it does not say anything about the results. You can test a product as the best, but still the product can be terrible. So I can do any test on my application I can think of. That could make me the best program-tester around. But still my application can fail a significant amount of test-cases and thus be a terrible product.

Today I got an unrequested marketing mail (that would fit the term Spam right?), that stated that a certain well-known producer of Security Applications "launches as the first malware vendor their newst product: XXX ", being a protection product for Virtual Machines.

Now, that starts me thinking. Am I going to buy Virus or Spam prevention-software from a vendor that calls itself a "malware vendor"? Or is this company eating from two walls? Feeding it's own mouth? It even let me query wiki, to be certain that I understand it right: "mallware is a 'collection-name' of software that is destructive or 'bad-willing' and is a contraction of the English words mallicious software" (free translated from the Dutch wiki-definition).
So apparently there was another marketing-person not thinking correctly about this communique.

Tuesday 1 September 2009

Process E-Mail with Oracle BPEL PM 10.1.2

This week I was asked to start with a new service that should process e-mail. It has to receive e-mail and split it up in different parts. It should save the content to a file-store and also put attachment to the same file store and keep track of the metadata of the mail, eg. from and to addresses, etc.

The BPEL version we use is still 10.1.2. I googled around and to find some examples. I found a pretty good example from Lucas Jellema, who based his one on an article byMatt Wright.

To initiate BPEL processes on incoming email is done through an Activation Agent. This is described in chapter 17. 3.6 of the documentation.

Lucas used Apache James as a demo email server, described here. It is really simple to set it up. Installation is nothing more than unzip the download, and start it using run.bat or run.sh from the <james_home>/bin folder. Then you have to kill it once, since the first run is not really a startup. At first startup it apparently unpacks some libraries, etc. After the second startup you can telnet to it using telnet localhost 4555. Login as root with password root and then you can add a user using adduser akkerm akkerm.

I had to process emails with attachements too. Soo I used Lucas' example java and extended it a little to be able to add an attachement also. Here is my code:


package sendmail;

import java.io.File;

import java.util.Properties;

import javax.activation.DataHandler;
import javax.activation.FileDataSource;

import javax.mail.Address;
import javax.mail.Message;
import javax.mail.Multipart;
import javax.mail.Session;
import javax.mail.Transport;
import javax.mail.internet.InternetAddress;
import javax.mail.internet.MimeBodyPart;
import javax.mail.internet.MimeMessage;
import javax.mail.internet.MimeMultipart;


public class EmailSender {
public EmailSender() {
}

public static void sendEmail(String to, String subject, String from,
String content, String attachment) throws Exception {
Properties props = new Properties();
props.setProperty("mail.transport.protocol", "smtp");
props.setProperty("mail.host", "localhost");
props.setProperty("mail.user", "akkerm");
props.setProperty("mail.password", "");

Session mailSession = Session.getDefaultInstance(props, null);
Transport transport = mailSession.getTransport();

MimeMessage message = new MimeMessage(mailSession);
message.addFrom(new Address[] { new InternetAddress("akkerm@localhost",
from) }); // the reply to email address and a logical descriptor of the sender of the email!

message.setSubject(subject);


message.addRecipient(Message.RecipientType.TO,
new InternetAddress(to));
// Add content
MimeBodyPart mbp1 = new MimeBodyPart();
mbp1.setText(content);

MimeBodyPart mbp2 = new MimeBodyPart();
// attach the file to the message
FileDataSource fds = new FileDataSource(attachment);
mbp2.setDataHandler(new DataHandler(fds));
mbp2.setFileName(fds.getName());


// create the Multipart and its parts to it
Multipart mp = new MimeMultipart();
mp.addBodyPart(mbp1);
mp.addBodyPart(mbp2);

// add the Multipart to the message
message.setContent(mp);


transport.connect();
transport.sendMessage(message,
message.getRecipients(Message.RecipientType.TO));
transport.close();
}

public static void main(String[] args) throws Exception {
String content = "Some test content from akkerm.";
EmailSender.sendEmail("akkerm@localhost", "An interesting message",
"THE APP", content, "c:/temp/in/excelfile.xls");
}
}


To be able to fetch the attachment of the mail I did the following. First I added a variable, called Multipart:
  <variable name="MultiPart" element="ns1:multiPart">

Where ns1: is xmlns:ns1="http://services.oracle.com/bpel/mail", the name space of the added XMLSchema. When you receive the message, you get a content-element. But to be able to handle it as a multiple parts you have to copy it to a variable based on the multipart element from the XSD.
Then you can count the number of parts using the expression:
count(bpws:getVariableData('inputVariable','payload',
'/ns1:mailMessage/ns1:content/ns1:multiPart/ns1:bodyPart'))

You can copy that in a variable that's called PartsCount of type xsd:int for example. To be able to loop over the parts you need an index also:

<variable name="PartsCount" type="xsd:int"/>
<variable name="PartIndex" type="xsd:int"/>

Then you can use a while loop with loop condition like:
bpws:getVariableData('PartIndex')<=bpws:getVariableData('PartsCount')

Within the loop you can copy the body part to a variable content that is also based on the multipart-element:
   <variable name="Content" element="ns1:multiPart"/> 

using the expression:
bpws:getVariableData('MultiPart','/ns1:multiPart/ns1:content/ns1:multiPart/ns1:bodyPart[bpws:getVariableData("PartIndex")]'

You need to copy that to the /ns1:multiPart/ns1:bodyPart part of the Content variable.

The content of a binary attachment is base64-encoded. If you want to save that to a file there are several options. Some of them are listed here. The most simple way to do that is to use a file write adapter. Configure it using the adapter wizard, and choose an "Opaque" xsd.
To be able to determine with which filename the file is written, you can use an adapater-header variable. Create a variable with the message type based on the header-type of the adapter-wsdl:
<variable name="FileWriteHeader" messageType="ns5:OutboundHeader_msg"/>

In the Invoke of the FileWrite partnerlink, you can add it as a header variable to use.


I already wrote about mcf-properties and headervariables here. I found that in SoaSuite 10.1.3 you can direct the fileadapter also to write to another directory then specified in the adapter wizard. But aparently this does not work in 10.1.2. You can override the directory via the header variable, by adding the property to the wsdl. But it keeps writing to the directory specified at designtime. The filename however is used from the header variable, so you that you can change.