
There are several jobschedule solutions. But it can also be done within BPEL PM. The advantage of this is that you can activate BPEL or ESB services or other Webservices without doing any programming. It is all started from the BPEL Console, where the certain instances can also be aborted. And you can make it as generic as you want and schedule as many instances as you want. So you can have a dayly, weekly and/or a monthly scheduled instance the same time.
What you have to do is to first create an asynchronous bpel process. Then change the accompanying xsd of the request/response documents so that the request document contains a Start DateTime element and a Duration element. You could also expand it with a “any” datagram to give it dynamic xml-fragments as input.

Illustration 1: Request Document Structure
Then add a Wait activity to the bpel process. Base it on the expression:
string(bpws:getVariableData('inputVariable','payload','/client:TimerKickoffProcessRequest/client:startDate'))
That is the startdate, with the String function around it to get valid content of the variable.
After the wait activity you can call the service you have to call, or add the activities that have to be performed. If you decide to code the activities in this process then you have to consider the expected duration ot these activities. If you expect a long duration, you might consider to move it to the end of this process, after the rescheduling of the process.
The step next is to calculate the next schedule date-time. This is done by adding duration to the start-time and copy the result to a variable:
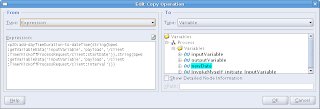
Illustration 2: Add duration to DateTime
For your convenience, here is the expression:
xp20:add-dayTimeDuration-to-dateTime(string(bpws:getVariableData('inputVariable','payload','/client:TimerKickoffProcessRequest/client:startDate')),string(bpws:getVariableData('inputVariable','payload','/client:TimerKickoffProcessRequest/client:interval')))
xp20:add-dayTimeDuration-to-dateTime(string(bpws:getVariableData('inputVariable','payload','/client:TimerKickoffProcessRequest/client:startDate')),string(bpws:getVariableData('inputVariable','payload','/client:TimerKickoffProcessRequest/client:interval')))
Then you'll have to invoke the process itself. Create a partnerlink, choose the process' own wsdl.
Create an invoke for it with an input variable. Add to the assign above two copy rules, one with the newDate and one with the duration from the process' input-variable.
One thing that have to be taken care off is the situation that the server get's down before the wait expires and then comes up several times the duration later. For example you have a “next DateTime” of 9:00 AM and a duration of 15 minutes. When the server gets down at 8:55 PM and gets up again at 11:00, then the process gets submitted several times, for 9:15, 9:30, 9:45 and so on.
One thing that have to be taken care off is the situation that the server get's down before the wait expires and then comes up several times the duration later. For example you have a “next DateTime” of 9:00 AM and a duration of 15 minutes. When the server gets down at 8:55 PM and gets up again at 11:00, then the process gets submitted several times, for 9:15, 9:30, 9:45 and so on.
So before the invoke is done, we have to “move” the next scheduled date time to after the current date time. this by adding the interval as often as needed to get the next dateTime later then the current-dateTime. The while-expression is:
string(bpws:getVariableData('InvokeMyself_initiate_InputVariable','payload','/client:TimerKickoffProcessRequest/client:startDate')) <= xp20:current-dateTime()
In the while loop we need an assign with a copy rule that copies the following expression to the startDate: xp20:add-dayTimeDuration-to-dateTime(string(bpws:getVariableData('InvokeMyself_initiate_InputVariable','payload','/client:TimerKickoffProcessRequest/client:startDate')),string(bpws:getVariableData('InvokeMyself_initiate_InputVariable','payload','/client:TimerKickoffProcessRequest/client:interval')))

Illustration 3: Alter startdate to catch up
The Resulting BPEL process is shown below:

Illustration 4: Resulting BPEL Process
Since the process calls itself, the deployment is not straightforward. Deploy the process and determine the location of the wsdl on your BPEL server. Then add this runtime WSDL to the bpel.xml using the following properties:
- wsdlLocation: TimerKickoff.wsdl
- wsdlRuntimeLocation: http://localhost:80/orabpel/default/TimerKickoff/TimerKickoff?wsdl
Then deploy it again. you can start the process in the BPEL Coonsole with giving a Start DateTime stamp with the format given. For a duration of 30 minutes give in: PT30M.
Update dd. 13-12-2012: I placed the original file on the file store on our website www.darwin-it.nl.


