Tuesday 29 September 2020

Logging in SOA Suite BPEL

This article feels like I should have written years ago. As it is, I haven't, but let's do it anyway.

A few weeks ago a (somewhat older) question on community.oracle.com caught my attention. It was about how to do logging in Oracle SOA Suite. 

This very much possible, and it can be simply done using an Embedded Java activity. However, if you want to have multiple loggings in a larger BPEL process, or have multiple BPEL components in a composite with multiple loggings scattered all over them, then Embedded Java activities aren't that practical.

So, I have developed a bit more sophisticated solution. For just one logging, it is a bit overdone, but I find it more practical with multiple loggings.

It starts with a quite simple Log wrapper class, that I added to GitHub. It is a wrapper around Java Util Logging, and helps with instantiating with a Logger instance. One of the constructors takes in a compositeName and componentName:

public class Log {
    private static final String BASE_PACKAGE="oracle.soa.bpel";
    private static Logger log;
    private String className;
...
    public Log(Class loggingClass) {
        super();
        setClassName(loggingClass.getName());
        log = Logger.getLogger(getClassName());
    }
    
    public Log(String loggingClass) {
        super();
        setClassName(loggingClass);
        log = Logger.getLogger(getClassName());
    }

    public Log(String compositeName, String componentName) {
        super();
        String loggingClass = BASE_PACKAGE+"."+compositeName+"."+componentName;             
        setClassName(loggingClass);
        log = Logger.getLogger(getClassName());
    }

An important aspect here is the static variable BASE_PACKAGE which is set to "oracle.soa.bpel". Which I'll get back to in a minute. The constructor uses this, and the compositeName and compentName to build up a sort of className, that it prefixes with the BASE_PACKAGE.

It also has some logging methods, that requires a methodName, that it uses as an extra identifier for the logging, added to the full class Name.

This class I 'deployed' to a jar file. This makes it reusable in multiple composites, while the source is versioned only once.

 Add it to the SCA_INF/lib folder of your composite:

But you could probably also add it to the oracle.soa.ext_11.1.1 folder in your $MW_HOME/soa/soa/modules folder and run the Ant script there: 

After running Ant in that folder, you should restart the server. The Ant script will add all the jar files in that folder, including yours, to the manifest file of the oracle.soa.ext.jar file in that folder. Doing so, it will be appended to the Classpath of SOA Suite.

To use this in your BPEL, it is important to add the following line at the beginning:

<import location="nl.darwinit.soautils.logging.Log" importType="http://schemas.oracle.com/bpel/extension/java"/>

Like this:

Having done that you can use the Log class in the Embbeded Java activity. To begin with, I find it usefull to add an Embedded Java to a scope which contains simple xsd:string based variables. Using an Assign you can easily assing proper values to the local variables:

The compositeName and componentName variables can be filled with ora:getCompositeName() and ora:getComponentName() respectively. Doing so makes it easier to access these values in an Embedded Java activity. The Java snippet Embedded Java in my example project is:

String compositeName = (String) getVariableData("compositeName");      
String componentName = (String) getVariableData("componentName");      
String text = (String) getVariableData("text");      
String methodName= (String) getVariableData("methodName");      
Log log = new Log(compositeName,componentName);     
  
String message="**** BPEL "+methodName +" " + text +" ****";    
log.info(methodName, message);    
addAuditTrailEntry(message);

The addAuditTrailEntry() shown in this snippet is an API that adds the message to the flowtrace also:


So not necessary for logging and also not specifically in scope of this article, but good to mention.
The message build up in this snippet is a concatenation of: "**** BPEL "+methodName +" " + text +" ****". This maybe handy in the AuditTrail, but in the log you may want to show just the text, like: log.info(methodName, text).

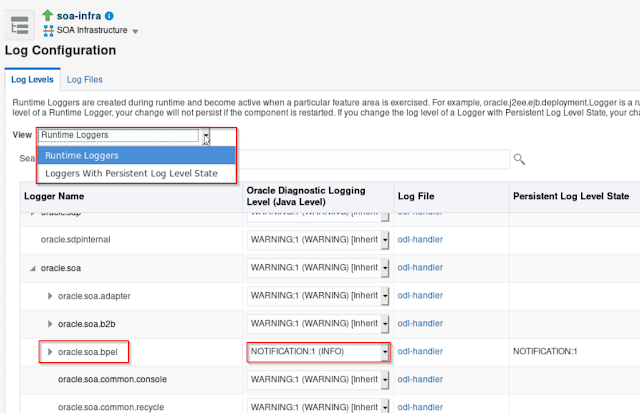
Earlier I mentioned the BASE_PACKAGE variable in the Log class. This refers to the oracle.soa.bpel log-appender. This can be configured in the soa-infra Log Configuration:


And then:

You could add a custom Logger, but it is easier to use an existing one. And to me it makes sense to use the oracle.soa.bpel Logger. If you would choose to use another logger, you would need to change the BASE_PACKAGE variable in the class.

Make sure it has a severity or Log Level low enough to cater for your logging. Set it to the Runtime Logger, but for persistence purpose you probably would need to add it to the "Loggers with Persistent Log Level State". For changing the Runtime logger, you would not need to restart the server. You do need to make sure that the "minimum severity to log" on the server in the WebLogic console.

Before you test, it can be handy to "tail" the diagnostic log as follows:

[oracle@ol7vm logs]$ tail -f DefaultServer-diagnostic.log |grep oracle.soa.bpel

I added my Demo BPEL process also to GitHub. If you test it, the output will be as follows:


So that works! Easy, right?

Now, this works for one simple Log in a BPEL process. But what about if you want to trace the flow using multiple Logs. And maybe even, in fault handlers log particular errors. The scope I introduced can be converted to a subProcess:


 I renamed the SubProcess to Log and then you can remove the Assign:


The scope is replaced with a call activity, that can be renamed. The scope variables now function as call arguments:

You can copy&paste this and rename it to reflect for instance a LogEnd activity:


Testing this, gives the following output:

As can be seen, now a simple log is done using a simple call activity. In this example the Log subprocess is within the same BPEL process, so you could move the setting of the componentName and compositeName variables in an assign in the subProcess, re-enstating the original assign.

However, you could of course move the Embedded Subprocess to a Reusable Subprocess. And then it might be usefull to be able to provide at least the componentName as an argument.

I think it is not so useful to put it in a separate BPEL process that can be called from external composites. In that case you would need to do an invoke with an accompanying assign and variable declarations for each Logging. So I would prefer to define either an embedded or a reusable subprocess for each composite/bpel that you want to do logging in.

Although I experience this article a few years late, I hope it does help.

Friday 25 September 2020

My boxes in the Vagrant Cloud

Last year I wrote about how I created a seemless desktop using Vagrant, VirtualBox en MobaXterm.

This week I was busy creating a new box with Oracle Linux, later switching to CentOS and installing several IDE's in it. And Docker.

Next week a big change is due for me. And for that I'll be going to switch laptops. Also others will going to use my vagrant project. Up till now I used local file based boxes. So if you wanted to use my projects that I posted on GitHub, you had not only to have the install binaries in a certain folder structure, but also the particular box downloaded in the particular boxes folder. 

This morning I decided to figure out how to publish them on the Vagrant cloud. And it is surprisingly easy, of course! Why I didn't do that before? Well, actually, I started with this by preparing a workshop for colleagues. And to simultaneously download the same box by every participant, did not seem a good idea. So I distributed the vagrant project with all the installers including the box on a stick.

But now, preparing for my laptop switch and distributing it for my colleagues, it seems a good idea.

I found this step by step article that guided me through the process. But let me go through the process my self.

First you'll need an account on the Vagrant Cloud. You can get there from the main page of vagrantup.com. And then click on the Find Boxes button:


Create a new account or login, if not already done that.

You'll land on the Search page:


There you can search for existing boxes. But to create and upload your own one, click on the Dashboard tab:

There click the "New Vagrant Box" button:


Here give the box a name and a short description. My first boxes had a version number in the name. But I found that a bit overdone, because later on you get to define a box versions. Click on the Create box button. I would urge you to provide a description that give some base, identifiable information on the box.


Provide a version, it's smart to start with 1 (it will check it), and possibly a description. Although I find a good base description important, I'm not sure what to write on a first version as a description. For subsequent versions, it seems a good to fill in as well. Like with GitHub/Subversion commit messages.

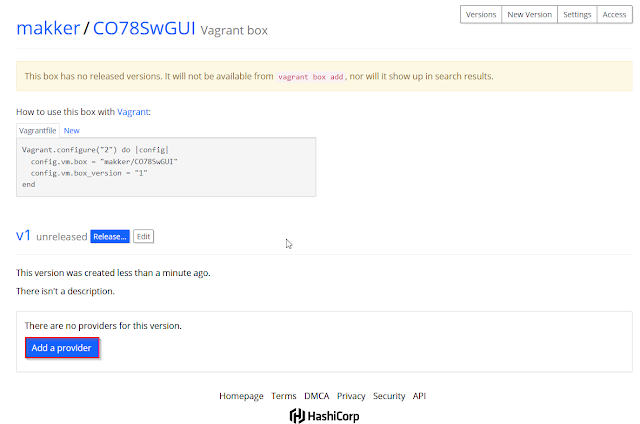
 Within the version, I was looking for an upload button, but you first get to define a provider. So click on the provider button:


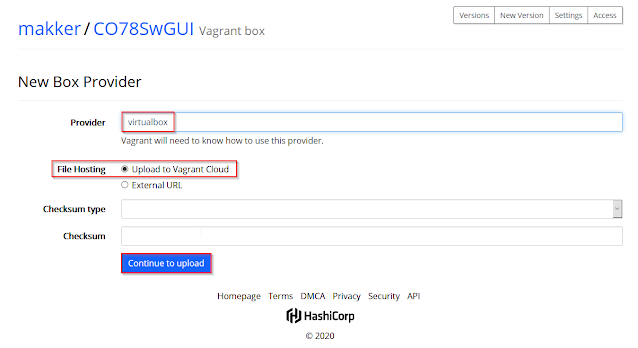
In the following page you get to define a provider. Provide virtualbox as a provider name. Vagrant need to be able to recognize and use that. But there is no poplist, so just a free text field.

I want to upload to the Vagrant Cloud, so the default will suffice. Click on the Continue to upload button:

Using the Browse button, browse to your Vagrant box and have it upload it.

Now, to be able to use the box, and others to discover your box, you'll need to release it. So go to the versions sub tab, and click on the Release button for the v1 version:


In the following page, click on the release button:

Now my boxes are searchable:


To use a box, you can create a Vagrant file with the following reference to the box:


Or create a new box in a new folder using a command like vagrant init makker/CO78SwGUI --box-version 1, continued by vagrant up:

d:\Projects\vagrant\co78>vagrant init makker/CO78SwGUI --box-version 1
A `Vagrantfile` has been placed in this directory. You are now
ready to `vagrant up` your first virtual environment! Please read
the comments in the Vagrantfile as well as documentation on
`vagrantup.com` for more information on using Vagrant.

d:\Projects\vagrant\co78>vagrant up
Bringing machine 'default' up with 'virtualbox' provider...
==> default: Box 'makker/CO78SwGUI' could not be found. Attempting to find and install...
    default: Box Provider: virtualbox
    default: Box Version: 1
==> default: Loading metadata for box 'makker/CO78SwGUI'
    default: URL: https://vagrantcloud.com/makker/CO78SwGUI
==> default: Adding box 'makker/CO78SwGUI' (v1) for provider: virtualbox
    default: Downloading: https://vagrantcloud.com/makker/boxes/CO78SwGUI/versions/1/providers/virtualbox.box

==> default: Waiting for cleanup before exiting...
Download redirected to host: vagrantcloud-files-production.s3.amazonaws.com

You can list boxes with the (sub)command vagrant box list:

d:\Projects\vagrant\co78>vagrant box list
CO77GUIv1.1          (virtualbox, 0)
makker/ol77SwGUIv1.1 (virtualbox, 1)

Remove a box with vagrant box remove CO77GUIv1.1:

d:\Projects\vagrant\co78>vagrant box remove CO77GUIv1.1
Box 'CO77GUIv1.1' (v0) with provider 'virtualbox' appears
to still be in use by at least one Vagrant environment. Removing
the box could corrupt the environment. We recommend destroying
these environments first:

rhfuse (ID: ca219fa1fe0b4984bf77aa7807c0feb2)

Are you sure you want to remove this box? [y/N] y
Removing box 'CO77GUIv1.1' (v0) with provider 'virtualbox'...

But you can add the freshly created box also using the vagrant box add command:

d:\Projects\vagrant\co78>vagrant box add makker/CO78SwGUI --box-version 1
==> box: Loading metadata for box 'makker/CO78SwGUI'
    box: URL: https://vagrantcloud.com/makker/CO78SwGUI
==> box: Adding box 'makker/CO78SwGUI' (v1) for provider: virtualbox
    box: Downloading: https://vagrantcloud.com/makker/boxes/CO78SwGUI/versions/1/providers/virtualbox.box
==> box: Box download is resuming from prior download progress
Download redirected to host: vagrantcloud-files-production.s3.amazonaws.com
Progress: 3% (Rate: 10.5M/s, Estimated time remaining: 0:03:29)

As can be seen it mentions that it started the download earlier, but I broke it off. It apparently resumes the download.

My current Vagrantfiles have the following declaration of the vagrant box:

...
BOX_NAME="CO78GUIv1.1"
BOX_URL="file://../boxes/CO78SwGUIv1.0.box"
VM_MEMORY = 12288 # 12*1024 MB
...
Vagrant.configure("2") do |config|
  # The most common configuration options are documented and commented below.
  # For a complete reference, please see the online documentation at
  # https://docs.vagrantup.com.

  # Every Vagrant development environment requires a box. You can search for
  # boxes at https://vagrantcloud.com/search.
  config.vm.box=BOX_NAME
  config.vm.box_url=BOX_URL
  config.vm.hostname=VM_HOST_NAME
  config.vm.define VM_MACHINE
  config.vm.provider :virtualbox do |vb|
    vb.name=VM_NAME
    vb.gui=VM_GUI
    vb.memory=VM_MEMORY
    vb.cpus=VM_CPUS
...

Based on the suggestion of the Vagrant Cloud:


I adapted this as follows:

...
BOX_NAME="makker/CO78SwGUI"
BOX_VERSION = "1"
#BOX_URL="file://../boxes/CO78SwGUIv1.0.box"
VM_MEMORY = 12288 # 12*1024 MB
...
Vagrant.configure("2") do |config|
  # The most common configuration options are documented and commented below.
  # For a complete reference, please see the online documentation at
  # https://docs.vagrantup.com.

  # Every Vagrant development environment requires a box. You can search for
  # boxes at https://vagrantcloud.com/search.
  config.vm.box = BOX_NAME
  config.vm.box_version = BOX_VERSION
  # config.vm.box_url=BOX_URL
  config.vm.hostname=VM_HOST_NAME
  config.vm.define VM_MACHINE
  config.vm.provider :virtualbox do |vb|
    vb.name=VM_NAME
    vb.gui=VM_GUI
    vb.memory=VM_MEMORY
  vb.cpus=VM_CPUS
...

I uncommented the BOX_URL variable with the config.vm.box_url lines. And added the BOX_VERSION and config.vm.box_version lines. Most importantly I changed the BOX_NAME variable to makker/CO78SwGUI.

These suggestions will download my Cloud boxes without me needing to distributed them separately.

Happy Upping!


Tuesday 8 September 2020

Silent install of SQL Developer

Last week I provided a script to automatically install the SOA or BPM Quickstart.

Today, below I'll provide a script to install SQL Developer on Windows. I always use the "zip-with-no-jre" file. Therefor installing it is simply unzipping it.

For unzipping, I use the java jar tool This is convenient, because if you want use SQL Developer you need a JDK (unless you choose to use the installer with jre). And if you have a jdk, you have the jar tool. The script mentioned in the previous article, takes care of installing java. So, if you want to do that as well, you could add it to this script.

One disadvantage of the jar  tool is that it can't unzip to a certain folder other than the current folder. So you have to CD to the folder into which you want to unzip it. The script therefor saves the current folder, and CD's to the unzip folder. After installation it CD's back.

The script unzips into the a subfolder, under C:\Oracle\SQLDeveloper. I like to keep my Oracle IDE's together, but grouped. Within the zip file there is a sqldeveloper folder, which is renamed to the name of the zip.

With SQLDeveloper 20.2 I found that it required the msvcr100.dll in the $JDK\jre\bin folder. Apparently in the latest JDK 8 update (261), that I used when creating this script, it wasn't. I found it in c:\Windows\System32 on my system, so I copied it from there to the $JDK\jre\bin folder. But a colleague didn't find it.

Another step in the script is that it copies the a copy of the UserSnippets.xml file. At my customer I created several handy maintenance queries that I saved as snippets. When you do so, you find those saved into the UserSnippets.xml file in the %USERPROFILE%\AppData\Roaming\SQL Developer. Where the %USERPROFILE% usually points to the C:\users\%{your windows username} folder.

If you want to share a copy of that to the users installing the tool using this script, you can save it in the same folder as this script. We keep it in SVN.

@echo off
set CMD_LOC=%~dp0
set CURRENT_DIR=%CD%
SETLOCAL
set SOFTWARE_HOME=x:\SOFTWARE\Software
set SQLDEV_INSTALL_HOME=%SOFTWARE_HOME%\SQL Developer
set SQLDEV_NAME=sqldeveloper-20.2.0.175.1842-no-jre
set SQLDEV_ZIP=%SQLDEV_INSTALL_HOME%\%SQLDEV_NAME%.zip
set SQLDEV_BASE=c:\Oracle\SQLDeveloper
set SQLDEV_HOME=%SQLDEV_BASE%\%SQLDEV_NAME%
set SQLDEV_USERDIR=%USERPROFILE%\AppData\Roaming\SQL Developer
set CMD_LIB=%CMD_LOC%\ext
rem Install SqlDeveloper
if not exist "%SQLDEV_HOME%" (
  echo SqlDeveloper does not yet exist in "%SQLDEV_HOME%".
  if exist "%SQLDEV_ZIP%" (
    echo Install SqlDeveloper in %SQLDEV_HOME%.
    if not exist "%SQLDEV_BASE%" (
      echo Create folder %SQLDEV_BASE%
      mkdir %SQLDEV_BASE%
    )
    cd %SQLDEV_BASE%
    echo Unzip SqlDeveloper "%SQLDEV_ZIP%" into %SQLDEV_BASE%
    "%JAVA_HOME%"\bin\jar.exe -xf "%SQLDEV_ZIP%"
    echo Rename unzipped folder "sqldeveloper" to %SQLDEV_NAME%
    rename sqldeveloper %SQLDEV_NAME%
    rem Deze library wordt verwacht in de Java home, maar komt blijkbaar niet meer standaard mee. 
    if not exist "%JAVA_HOME%\jre\bin\msvcr100.dll" (
      echo Copy msvcr100.dll from c:\Windows\System32\ to "%JAVA_HOME%\jre\bin"
      copy c:\Windows\System32\msvcr100.dll "%JAVA_HOME%\jre\bin"
    ) else (
      echo Library "%JAVA_HOME%\jre\bin\msvcr100.dll" already exists.
    )
    if not exist "%SQLDEV_USERDIR%" (
      echo Create folder "%SQLDEV_USERDIR%"
      mkdir "%SQLDEV_USERDIR%"
    )
    if not exist "%SQLDEV_USERDIR%\UserSnippets.xml" (
      echo Copy "%CMD_LOC%\UserSnippets.xml" naar "%SQLDEV_USERDIR%"
      copy "%CMD_LOC%\UserSnippets.xml" "%SQLDEV_USERDIR%" /Y
    ) else (
      echo User Snippets "%SQLDEV_USERDIR%\UserSnippets.xml" already exists.
    )
    cd %CURRENT_DIR%
  ) else (
    echo SqlDeveloper zip  "%SQLDEV_ZIP%" does not exist!
  )
) else (
  echo SqlDeveloper already installed in %SQLDEV_HOME%.
)
echo Done.
ENDLOCAL

Update 2020-09-09: in the line with mkdir "%SQLDEV_USERDIR%", there should be quotes around the folder, since there is a space in it.
The folder structure "%USERPROFILE%\AppData\Roaming\SQL Developer" is taken from an existing installation. This is where SQLDeveloper expects the user data.

Monday 31 August 2020

Silently Install SOA QuickStart Revised


Earlier I wrote a script to silently install the SOA QuickStart installer and wrote about it here

Several customer projects further and iterations on the script further, I revised this script lately again. Because I'm leaving this customer in a week or three, and to help my successors to build up their development pc's in a comfortable and standard way.

You may have noticed that over the years I've grown fond of scripting stuff, especially building up environments. At my current customer every developer installed the several IDE's, test tooling and TortoiseSVN by hand. So every one has the tooling in another folder structure. Checked out the subversion repo's by hand and therefor in another structure. 

So, scripting things help in having the tooling in the same folder structure for every one. And that reduces the chances on problems and misconfigurations. Especially preventing the infamous phrase: 'It works with me...' when having problems.

One of the revisions is to have nested if-else structures in the script, which makes it more readable then the conditional goto's we were used to use in Windows .bat files.

Another important improvement was to have the install binaries in a separate fileserver-repository. This makes it possible to have the scripting and depending files in a Subversion repository.

The script improved installSoaQS.bat is as follows:

@echo off
rem Part 1: Settings
rem set JAVA_HOME=c:\Oracle\Java\jdk8
set JAVA_HOME=c:\Program Files\Java\jdk1.8.0_261
set SOFTWARE_HOME=Z:\Software
set JDK8_INSTALL_HOME=%SOFTWARE_HOME%\Java\JDK8
set JAVA_INSTALLER=%JDK8_INSTALL_HOME%\jdk-8u261-windows-x64.exe
rem set FMW_HOME=C:\oracle\JDeveloper\12213_SOAQS
set QS_INSTALL_HOME=%SOFTWARE_HOME%\Oracle\SOAQuickStart12.2.1.3
set QS_EXTRACT_HOME=%TEMP%\Oracle\SOAQuickStart12.2.1.3
set FMW_HOME=C:\oracle\JDeveloper\12213_SOAQS
set QS_RSP=soaqs1221_silentInstall.rsp
set QS_RSP_TPL=%QS_RSP%.tpl
set QS_JAR=fmw_12.2.1.3.0_soa_quickstart.jar
set QS_ZIP=%QS_INSTALL_HOME%\fmw_12.2.1.3.0_soaqs_Disk1_1of2.zip
set QS_JAR2=fmw_12.2.1.3.0_soa_quickstart2.jar
set QS_ZIP2=%QS_INSTALL_HOME%\fmw_12.2.1.3.0_soaqs_Disk1_2of2.zip
set QS_USER_DIR=c:\Data\JDeveloper\SOA
set CMD_LOC=%~dp0
set CURRENT_DIR=%CD%
rem Part 2: Install Java
rem Set JAVA_HOME
echo setx -m JAVA_HOME "%JAVA_HOME%"
setx -m JAVA_HOME "%JAVA_HOME%"
echo JAVA_HOME=%JAVA_HOME%
rem Check Java
if not exist "%JAVA_HOME%" (
  if exist "%JAVA_INSTALLER%" (
    echo Install %JAVA_HOME% 
    %JAVA_INSTALLER% /s INSTALLDIR="%JAVA_HOME%"
    if exist "%JAVA_HOME%" (
      echo Java Installer %JAVA_INSTALLER% succeeded.
    ) else (      
      echo Java Installer %JAVA_INSTALLER% apparently failed.
    )
  ) else (
    echo Java Installer %JAVA_INSTALLER% does not exist.
  )
) else (
  echo JAVA_HOME %JAVA_HOME% exists
)
rem Part 3: Check the QuickStart Installer Files
rem check SOA12.2 QS
if exist "%JAVA_HOME%" (
  if not exist "%FMW_HOME%" (
    echo Quickstart Installer %QS_JAR% not installed yet.
    echo Let's try to install it in %FMW_HOME%
    if not exist %QS_EXTRACT_HOME% (
      echo Temp folder %QS_EXTRACT_HOME% does not exist, create it.
      mkdir %QS_EXTRACT_HOME%
    ) else (
      echo Temp folder %QS_EXTRACT_HOME% already exists.
    )
    echo Change to %QS_EXTRACT_HOME% for installation.
    cd %QS_EXTRACT_HOME%
    rem Check Quickstart is unzipped
    echo Check if QuickStart Installer is unzipped.
    rem Check QS_JAR
    if not exist "%QS_JAR%" (
      echo QuickStart Jar part 1 %QS_JAR% does not exist yet.
      if exist "%QS_ZIP%" (
        echo Unzip QuickStart Part 1 %QS_ZIP%
        "%JAVA_HOME%"\bin\jar.exe -xf %QS_ZIP% 
        if exist "%QS_JAR%" (
          echo QuickStart Jar part 1 %QS_JAR% now exists.
        ) else (
          echo QuickStart Jar part 1 %QS_JAR% still not exists.
        )
      ) else (
        echo QuickStart ZIP part 1 %QS_ZIP% does not exist.
      )
    ) else ( 
      echo QuickStart Jar part 1 %QS_JAR% exists.
    )
    rem Check QS_JAR2
    if exist "%QS_JAR%" (
      if not exist "%QS_JAR2%" (
        echo QuickStart Jar part 2 %QS_JAR2% does not exist yet.
        if exist "%QS_ZIP2%" (
          echo Unzip QuickStart Part 2 %QS_ZIP2%
          "%JAVA_HOME%"\bin\jar.exe -xf %QS_ZIP2% 
          if exist "%QS_JAR2%" (
            echo QuickStart Jar part 2 %QS_JAR2% now exists.
          ) else (
            echo QuickStart Jar part 2 %QS_JAR2% still not exists.
          )
        ) else (
          echo QuickStart ZIP part 2 %QS_ZIP2% does not exist.
        )
      ) else ( 
        echo QuickStart Jar part 2 %QS_JAR2% exists.
      )
    ) 
    rem Part 4: Install the QuickStart
    echo Install %FMW_HOME% 
    echo Expand Response File Template %CMD_LOC%\%QS_RSP_TPL% to %CMD_LOC%\%QS_RSP%
    powershell -Command "(Get-Content %CMD_LOC%\%QS_RSP_TPL%) -replace '\$\{ORACLE_HOME\}', '%FMW_HOME%' | Out-File -encoding ASCII %CMD_LOC%\%QS_RSP%"
    echo Silent install SOA QuickStart, using response file: %CMD_LOC%\%QS_RSP%
    "%JAVA_HOME%\bin\java.exe" -jar %QS_JAR% -silent -responseFile %CMD_LOC%\%QS_RSP% -nowait
    echo Change back to %CURRENT_DIR%.
    cd %CURRENT_DIR%
    if exist "%FMW_HOME%" (
      echo FMW_HOME %FMW_HOME% exists
      rem Part 5: update the JDeveloper User Home location.
      echo "et the JDeveloper user home settings
      if not exist %QS_USER_DIR% mkdir %QS_USER_DIR%
      echo set  JDEV_USER_DIR_SOA and JDEV_USER_HOME_SOA as  %QS_USER_DIR%
      setx -m JDEV_USER_DIR_SOA %QS_USER_DIR%
      setx -m JDEV_USER_HOME_SOA %QS_USER_DIR%
      echo copy %CMD_LOC%\jdev.boot naar "%FMW_HOME%\jdeveloper\jdev\bin"
      copy "%FMW_HOME%\jdeveloper\jdev\bin\jdev.boot" "%FMW_HOME%\jdeveloper\jdev\bin\jdev.boot.org" /Y
      copy %CMD_LOC%\jdev.boot "%FMW_HOME%\jdeveloper\jdev\bin" /Y
      echo copy %CMD_LOC%\ide.conf naar "%FMW_HOME%\jdeveloper\ide\bin"
      copy "%FMW_HOME%\jdeveloper\ide\bin\ide.conf" "%FMW_HOME%\jdeveloper\ide\bin\ide.conf.org" /Y
      copy %CMD_LOC%\ide.conf "%FMW_HOME%\jdeveloper\ide\bin" /Y
    ) else (
      echo Quickstart Installer %QS_JAR% apparently failed.  
    )
  ) else (
    echo Quickstart Installer %QS_JAR% already installed in %FMW_HOME%.
  )
) else (
  echo %JAVA_HOME% doesn't exist so can't install SOA Quick Start.
)
echo Done
It first installs Oracle JDK 8 Update 261. Of course you can split this script to do only the Java install.
Then it checks the existance of the QuickStart install files as Zip files. It will create a Oracle\SOAQuickStart12.2.1.3 folder in the Windows %TEMP% Folder. After saving the current folder, it will do a change directory to it, to unzip the Installer Zip files into that temp folder. After the installation of the Quickstart it will change back to the saved folder. 

Mind that the %TEMP%\Oracle\SOAQuickStart12.2.1.3 is not removed afterwards.

The script expects the following files:

File
Location
jdk-8u261-windows-x64.exeZ:\Software\Java\JDK8    
fmw_12.2.1.3.0_soaqs_Disk1_1of2.zipZ:\Software\Oracle\SOAQuickStart12.2.1.3
fmw_12.2.1.3.0_soaqs_Disk1_2of2.zipZ:\Software\Oracle\SOAQuickStart12.2.1.3
fmw_12.2.1.3.0_soa_quickstart.jarExtracted into %TEMP%\Oracle\SOAQuickStart12.2.1.3
fmw_12.2.1.3.0_soa_quickstart2.jarExtracted into %TEMP%\Oracle\SOAQuickStart12.2.1.3
soaqs1221_silentInstall.rsp.tplSame folder as the script
jdev.bootSame folder as the script
ide.confSame folder as the script

These files are set in the variables at the top of the script. As you can see it will install the 12.2.1.3 version of the SOA QuickStart. This is because, that is the version we currently use. But, if you want to use 12.2.1.4, as I would recommend, then just change the relevant variables at the top. Same counts if you would want to use the BPM QuickStart: just change the relevant variables accordingly.
It will install the QuickStart  into the folder C:\oracle\JDeveloper\12213_SOAQS. I do like to have an Oracle Home folder that not only shows the version but also the type of the product. I dislike the default of Oracle: C:\Oracle\Middleware.

The install script expects a file soaqs1221_silentInstall.rsp.tpl which is the template file of the response file:
[ENGINE]

#DO NOT CHANGE THIS.
Response File Version=1.0.0.0.0

[GENERIC]

#Set this to true if you wish to skip software updates
DECLINE_AUTO_UPDATES=true

#My Oracle Support User Name
MOS_USERNAME=

#My Oracle Support Password
MOS_PASSWORD=<SECURE VALUE>

#If the Software updates are already downloaded and available on your local system, then specify the path to the directory where these patches are available and set SPECIFY_DOWNLOAD_LOCATION to true
AUTO_UPDATES_LOCATION=

#Proxy Server Name to connect to My Oracle Support
SOFTWARE_UPDATES_PROXY_SERVER=

#Proxy Server Port
SOFTWARE_UPDATES_PROXY_PORT=

#Proxy Server Username
SOFTWARE_UPDATES_PROXY_USER=

#Proxy Server Password
SOFTWARE_UPDATES_PROXY_PASSWORD=<SECURE VALUE>

#The oracle home location. This can be an existing Oracle Home or a new Oracle Home
ORACLE_HOME=${ORACLE_HOME}

When the install was succesfull it will also copy the file ide.conf to the corresponding folder in the Jdeveloper home, to set proper heapsizes, since the default heapsize of Jdeveloper is quite sparingly. Also it copies the jdev.conf to the proper folder, to have a the Jdeveloper User dirs set to C:\Data\Jdeveloper\SOA. As can be set at the top as well. The rationale for this is to have the Jdeveloper User Dir out side the Windows User Profile, and thus more accessible. Also it allows for having also another Jdeveloper installation that is of the same base version, but does not have the SOA/BPM quickstart add-ons. For instance for plain Java-ADF development.

The used ide.conf is as follows:

#-----------------------------------------------------------------------------
#
# ide.conf - IDE configuration file for Oracle FCP IDE.
#
# Copyright (c) 2000, 2016, Oracle and/or its affiliates. All rights reserved.
#
#-----------------------------------------------------------------------------
#
# Relative paths are resolved against the parent directory of this file.
#
# The format of this file is:
#
#    "Directive      Value" (with one or more spaces and/or tab characters
#    between the directive and the value)  This file can be in either UNIX
#    or DOS format for end of line terminators.  Any path seperators must be
#    UNIX style forward slashes '/', even on Windows.
#
# This configuration file is not intended to be modified by the user.  Doing so
# may cause the product to become unstable or unusable.  If options need to be
# modified or added, the user may do so by modifying the custom configuration files
# located in the user's home directory.  The location of these files is dependent
# on the product name and host platform, but may be found according to the
# following guidelines:
#
# Windows Platforms:
#   The location of user/product files are often configured during installation,
#   but may be found in:
#     %APPDATA%\<product-name>\<product-version>\product.conf
#     %APPDATA%\<product-name>\<product-version>\jdev.conf
#
# Unix/Linux/Mac/Solaris:
#   $HOME/.<product-name>/<product-version>/product.conf
#   $HOME/.<product-name>/<product-version>/jdev.conf
#
# In particular, the directives to set the initial and maximum Java memory
# and the SetJavaHome directive to specify the JDK location can be overridden
# in that file instead of modifying this file.
#
#-----------------------------------------------------------------------------

IncludeConfFile ../../ide/bin/jdk.conf

AddJavaLibFile ../../ide/lib/ide-boot.jar

# All required Netbeans jars for running Netbinox
AddJavaLibFile  ../../netbeans/platform/lib/boot.jar
AddJavaLibFile  ../../netbeans/platform/lib/org-openide-util-ui.jar
AddJavaLibFile  ../../netbeans/platform/lib/org-openide-util.jar
AddJavaLibFile  ../../netbeans/platform/lib/org-openide-util-lookup.jar
AddJavaLibFile  ../../netbeans/platform/lib/org-openide-modules.jar

# Oracle IDE boot jar
AddJavaLibFile ../../ide/lib/fcpboot.jar
SetMainClass oracle.ide.osgi.boot.OracleIdeLauncher

# System properties expected by the Netbinox-Oracle IDE bridge
AddVMOption  -Dnetbeans.home=../../netbeans/platform/
AddVMOption  -Dnetbeans.logger.console=true
AddVMOption  -Dexcluded.modules=org.eclipse.osgi
AddVMOption  -Dide.cluster.dirs=../../netbeans/fcpbridge/:../../netbeans/ide/:../../netbeans/../

# Turn off verifications since the included classes are already verified
# by the compiler.  This will reduce startup time significantly.  On
# some Linux Systems, using -Xverify:none will cause a SIGABRT, if you
# get this, try removing this option.
#
AddVMOption  -Xverify:none

# With OSGI, the LAZY (ondemand) extension loading mode is the default,
# to turn it off, use any other words, ie EAGER
#
AddVMOption  -Doracle.ide.extension.HooksProcessingMode=LAZY

#
# Other OSGi configuration options for locating bundles and boot delegation.
#
AddVMOption  -Dorg.eclipse.equinox.simpleconfigurator.configUrl=file:bundles.info
AddVMOption  -Dosgi.bundles.defaultStartLevel=1
AddVMOption  -Dosgi.configuration.cascaded=false
AddVMOption  -Dosgi.noShutdown=true
AddVMOption  -Dorg.osgi.framework.bootdelegation=*
AddVMOption  -Dosgi.parentClassloader=app
AddVMOption  -Dosgi.locking=none
AddVMOption  -Dosgi.contextClassLoaderParent=app

# Needed for PL/SQL debugging
#
# To be disabled when we allow running on JDK9
AddVMOption  -Xbootclasspath/p:../../rdbms/jlib/ojdi.jar

# To be enabled when we allow running on JDK9
#AddVM8Option  -Xbootclasspath/p:../../rdbms/jlib/ojdi.jar
#AddJava9OrHigherLibFile ../../rdbms/jlib/ojdi.jar

# Needed to avoid possible deadlocks due to Eclipse bug 121737, which in turn is tied to Sun bug 4670071
AddVMOption   -Dosgi.classloader.type=parallel

# Needed for performance as the default bundle file limit is 100
AddVMOption   -Dosgi.bundlefile.limit=500

# Controls the allowed number of IDE processes. Default is 10, so if a higher limit is needed, uncomment this
# and set to the new limit. The limit can be any positive integer; setting it to 0 or a negative integer will
# result in setting the limit back to 10.
# AddVMOption -Doracle.ide.maxNumberOfProcesses=10

# Configure location of feedback server (Oracle internal use only)
AddVMOption -Dide.feedback-server=ide.us.oracle.com

# For the transformation factory we take a slightly different tack as we need to be able to
# switch the transformation factory in certain cases
#
AddJavaLibFile ../../ide/lib/xml-factory.jar
AddVMOption -Djavax.xml.transform.TransformerFactory=oracle.ide.xml.switchable.SwitchableTransformerFactory

# Override the JDK or XDK XML Transformer used by the SwitchableTransformerFactory
# AddVMOption -Doracle.ide.xml.SwitchableTransformer.jdk=...


# Pull parser configurations
AddJavaLibFile  ../../ide/lib/woodstox-core-asl-4.2.0.jar
AddJavaLibFile  ../../ide/lib/stax2-api-3.1.1.jar
AddVMOption -Djavax.xml.stream.XMLInputFactory=com.ctc.wstx.stax.WstxInputFactory
AddVMOption -Djavax.xml.stream.util.XMLEventAllocator=oracle.ideimpl.xml.stream.XMLEventAllocatorImpl

# Enable logging of violations of Swings single threaded rule. Valid arguments: bug,console
# Exceptions to the rule (not common) can be added to the exceptions file
AddVMOption -Doracle.ide.reportEDTViolations=bug
AddVMOption -Doracle.ide.reportEDTViolations.exceptionsfile=./swing-thread-violations.conf

# Set the default memory options for the Java VM which apply to both 32 and 64-bit VM's.
# These values can be overridden in the user .conf file, see the comment at the top of this file.
#AddVMOption  -Xms128M
#AddVMOption  -Xmx800M
AddVMOption  -Xms2048M
AddVMOption  -Xmx2048M
AddVMOption  -XX:+UseG1GC 
AddVMOption  -XX:MaxGCPauseMillis=200
# Shows heap memory indicator in the status bar.
AddVMOption -DMainWindow.MemoryMonitorOn=true 

#
# This option controls the log level at which we must halt execution on
# start-up. It can be set to either a string, like 'SEVERE' or 'WARNING',
# or an integer equivalent of the desired log level.
#
# AddVMOption   -Doracle.ide.extension.InterruptibleExecutionLogHandler.interruptLogLevel=OFF

#
# This define keeps track of command line options that are handled by the IDE itself.
# For options that take arguments (-option:<arguments>), add the fixed prefix of
# the the option, e.g. -role:.
#
AddVMOption -Doracle.ide.IdeFrameworkCommandLineOptions=-clean,-console,-debugmode,-migrate,-migrate:,-nomigrate,-nonag,-nondebugmode,-noreopen,-nosplash,-role:,-su

The used jdev.conf is as follows:

#--------------------------------------------------------------------------
#
#  Oracle JDeveloper Boot Configuration File
#  Copyright 2000-2012 Oracle Corporation. 
#  All Rights Reserved.
#
#--------------------------------------------------------------------------
include ../../ide/bin/ide.boot

#
# The extension ID of the extension that has the <product-hook>
# with the IDE product's branding information. Users of JDeveloper
# should not change this property.
#
ide.product = oracle.jdeveloper

#
# Fallback list of extension IDs that represent the different
# product editions. Users of JDeveloper should not change this
# property.
#
ide.editions = oracle.studio, oracle.j2ee, oracle.jdeveloper

#
# The image file for the splash screen. This should generally not
# be changed by end users.
#
ide.splash.screen = splash.png

#
# The image file for the initial hidden frame icon. This should generally not
# be changed by end users.
#
hidden.frame.icon=jdev_icon.gif

#
# Copyright start is the first copyright displayed. Users of JDeveloper
# should not change this property.
#
copyright.year.start = 1997

#
# Copyright end is the second copyright displayed. Users of JDeveloper
# should not change this property.
#
copyright.year.end = 2014

#
# The ide.user.dir.var specifies the name of the environment variable
# that points to the root directory for user files.  The system and
# mywork directories will be created there.  If not defined, the IDE
# product will use its base directory as the user directory.
#
#ide.user.dir.var = JDEV_USER_HOME,JDEV_USER_DIR
ide.user.dir.var = JDEV_USER_HOME_SOA,JDEV_USER_DIR_SOA

#
# This will enable a "virtual" file system feature within JDeveloper.
# This can help performance for projects with a lot of files,
# particularly under source control.  For non-Windows platforms however,
# any file changes made outside of JDeveloper, or by deployment for
# example, may not be picked by the "virtual" file system feature.  Do
# not enable this for example, on a Linux OS if you use an external editor.
#
#VFS_ENABLE = true

#
# If set to true, prevent laucher from checking/setting the shell
# integration mechanism. Shell integration on Windows associates 
# files with JDeveloper.
#
# The shell integration feature is enabled by default
#
#no.shell.integration = true

#
# Text buffer deadlock detection setting (OFF by default.)  Uncomment
# out the following option if encountering deadlocks that you suspect
# buffer deadlocks that may be due to locks not being released properly.
#
#buffer.deadlock.detection = true

#
# This option controls the parser delay (i.e., for Java error underlining)
# for "small" Java files (<20k).  The delay is in milliseconds.  Files 
# between the "small" (<20k) and "large" (>100k) range will scale the
# parser delay accordingly between the two delay numbers.
#
# The minimum value of this delay is 100 (ms), the default is 300 (ms).
#
ceditor.java.parse.small = 300

#
# This option controls the parser delay (i.e., for Java error underlining)
# for "large" Java files (>100k).  The delay is in milliseconds.
#
# The minimum value for this delay is 500 (ms), the default is 1500 (ms).
#
ceditor.java.parse.large = 1500

#
# This option is to pass additional vm arguments to the out-of-process
# java compiler used to build the project(s).  The arguments
# are used for both Ojc & Javac.
#
compiler.vmargs = -Xmx512m

#
# Additional (product specific) places to look for extension jars.
#
ide.extension.search.path=jdev/extensions:sqldeveloper/extensions

#
# Additional (product specific) places to look for roles.
#
ide.extension.role.search.path=jdev/roles

#
# Tell code insight to suppress @hidden elements 
#
insight.suppresshidden=true

#
# Disable Feedback Manager. The feedback manager is for internal use
# only.
#
feedbackmanager.disable=false

#
# Prevents the product from showing translations for languages other
# than english (en) and japanese (ja). The IDE core is translated into
# other languages, but other parts of JDeveloper are not. To avoid
# partial translations, we throttle all locales other than en and ja.
#
ide.throttleLocale=true

#
# Specifies the locales that we support translations for when 
# ide.throttleLocale is true. This is a comma separated list of 
# languages. The default value is en,ja.
#
ide.supportedLocales=en,ja

#
# Specifies the maximum number of JAR file handles that will be kept
# open by the IDE class loader.  A lower number keeps JDeveloper from
# opening too many file handles, but can reduce performance.
#
ide.max.jar.handles=500

#
# Specifies the classloading layer as OSGi. In the transition period
# to OSGi this flag can be used to check if JDev is running in OSGi
# mode.
#
oracle.ide.classload.layer=osgi


Thursday 27 August 2020

Finally created an Oracle Linux 8.2 myself


I'm certainly not the first one to do a fresh Oracle Linux 8 installation. For instance the great Tim Hall already wrote about it. My setup is quite similar, apart from:

  • I use 8.2 which is the latest-greatest at the moment.
  • For my Vagrant projects I want a base box with the Server with GUI topology. So I used that, which was actually the default in the wizard.
  • I use a NAT network adapter, for my Vagrant projects, so I skipped the network setting Tim Hall mentions.

Now, I use this as a base box for my Vagrant projects, and therefor I don't do this installation on a dayly basis. I have a Oracle Linux 7.7 box, and haven't had much problems with it.

However, I did had troubles with installing the Guest Additions this time. It didn't have the kernel-devel and kernel-header packages installed. Which is quite normal, so I did it using yum. However I kept getting the anoying mesasge that it couldn't get the 5.4.17-2011.5.3.el8uek.x86_64 version of the kernel headers. And the Guest Additions still wouldn't install. 

It kept me busy for some time, until I realized that by default it starts with the 5.4.x UEK kernel, while I it could install the kernel packages and headers for the 4.18.0.x  version.

So I found out how to startup with the correct kernel (correct in the sense that it is the kernel that allows me to use the GuestAdditions...). This can be done as follows:

sudo grubby --info=ALL

This lists the currently installed kernels. However, I found out that it is more convenient to check out the /boot folder:
sudo ls /boot//vmlinuz-*
/boot//vmlinuz-0-rescue-fddb3eeab19e4a928d6bfa04e0f91830
/boot//vmlinuz-4.18.0-193.14.3.el8_2.x86_64
/boot//vmlinuz-4.18.0-193.el8.x86_64
/boot//vmlinuz-5.4.17-2011.5.3.el8uek.x86_64

This merely because for setting the default kernel I need to provide the link to the image, also with a grubby command:
sudo grubby --set-default /boot/vmlinuz-4.18.0-193.14.3.el8_2.x86_64

Now, I can nicely install the necessary packages for the Guest Additions:
sudo dnf install kernel-devel kernel-headers gcc make perl

Next stop: boxing it into a Vagrant box.

Requeue expired JMS-AQ Messages

At my current customer we use JMS queues that are implemented with AQ queues based on sys.aq$_jms_text_message. In Weblogic you can create a so-called Foreign server that is able to interact with these queues over a datasource. For a Weblogic application, like SOA Suite or OSB, it is as if it is a regular Weblogic JMS queue. Pretty smart, because unlike a JDBC based Weblogic JMS Server, you can not only use the sys.aq$_jms_text_message type to query the aq table, as I described earlier. Not only that, you can also use the AQ PL/Sql api's to enqueue and dequeue these messages.

This can come in handy when you need to purge the tables, to remove the expired messages. But this morning there was a hickup in OSB, so that it couldn't process these messages succesfully. Because of the persisting rollbacks the messages are moved to the exception queue by AQ with the reason 'MAX_RETRY_EXCEEDED'. After I investigated the issue and some interaction with our admins the OSB was restarted which solved the problem.

But the earlier expired messages were still in the exception queue and processes were waiting for the response. So I thought it would be fun to have my own script to re-enqueue the expired messages. 

Although the admins turned out to have scripts for this, I would like to have my own. Theirs maybe smarter or at least they had more time to develop.

This script is at least publishable and might be a good starting point if you have to do something with AQ.

declare
  l_except_queue varchar2(30) := 'AQ$_DWN_OUTBOUND_TABLE_E';
  l_dest_queue varchar2(30) := 'DWN_OUTBOUND';
  l_message_type varchar2(30) := 'registersomethingmessage';
  cursor c_qtb 
    is select  qtb.queue_table 
      , qtb.queue 
      , qtb.msg_id
      , qtb.corr_id correlation_id
      , qtb.msg_state
      , qtb.enq_timestamp
      , qtb.user_data
      , qtb.user_data.header.replyto
      , qtb.user_data.header.type type
      , qtb.user_data.header.userid userid
      , qtb.user_data.header.appid appid
      , qtb.user_data.header.groupid groupid
      , qtb.user_data.header.groupseq groupseq
      , qtb.user_data.header.properties properties
      , (select str_value from table (qtb.user_data.header.properties) prp where prp.name = 'JMSCorrelationID') JMSCorrelationID
      , (select str_value from table (qtb.user_data.header.properties) prp where prp.name = 'JMSMessageID') JMSMsgID
      , (select str_value from table (qtb.user_data.header.properties) prp where prp.name = 'tracking_compositeInstanceId') tracking_compositeInstanceId
      , (select str_value from table (qtb.user_data.header.properties) prp where prp.name = 'JMS_OracleDeliveryMode') JMS_OracleDeliveryMode
      , (select str_value from table (qtb.user_data.header.properties) prp where prp.name = 'tracking_ecid') tracking_ecid
      , (select num_value from table (qtb.user_data.header.properties) prp where prp.name = 'JMS_OracleTimestamp') JMS_OracleTimestamp
      , (select str_value from table (qtb.user_data.header.properties) prp where prp.name = 'tracking_parentComponentInstanceId') tracking_prtCptInstanceId
      , (select str_value from table (qtb.user_data.header.properties) prp where prp.name = 'tracking_conversationId') tracking_conversationId
      , (select str_value from table (qtb.user_data.header.properties) prp where prp.name = 'BPEL_SENSOR_NAME') bpel_sensor_name
      , (select str_value from table (qtb.user_data.header.properties) prp where prp.name = 'BPEL_PROCESS_NAME') bpel_process_name
      , (select str_value from table (qtb.user_data.header.properties) prp where prp.name = 'BPEL_PROCESS_REVISION') bpel_process_rev
      , (select str_value from table (qtb.user_data.header.properties) prp where prp.name = 'BPEL_DOMAIN') bpel_domain
      , (select str_value from table (qtb.user_data.header.properties) prp where prp.name = 'SBLCorrelationID') SBLCorrelationID
      , qtb.user_data.header
      , qtb.user_data.text_lob text_lob
      , qtb.user_data.text_vc text_vc
      , qtb.expiration_reason
      --, qtb.*
      from (
        select 'DWN_OUTBOUND_TABLE' queue_table
        , qtb.* 
        from AQ$DWN_OUTBOUND_TABLE qtb
      ) qtb
      where qtb.user_data.text_vc  like '<'||l_message_type||'%'
      and qtb.msg_state = 'EXPIRED'
      and qtb.expiration_reason = 'MAX_RETRY_EXCEEDED'
      order by queue_table, enq_timestamp asc;
  l_payload SYS.AQ$_JMS_TEXT_MESSAGE;
  l_sbl_correlation_id varchar2(100);
  l_parentComponentInstanceId varchar2(100);
  l_jms_type varchar2(100);
  --
  function get_jms_property(p_payload in SYS.AQ$_JMS_TEXT_MESSAGE, p_property_name in varchar2)
  return varchar2
  as
    l_property varchar2(32767);
  begin
    select str_value into l_property from table (l_payload.header.properties) prp where prp.name = p_property_name;
    return l_property;
  exception
    when no_data_found then
      return null;
  end get_jms_property;
  --
  procedure dequeue_msg(p_queue in varchar2, p_msg_id in raw)
  is
    l_dequeue_options dbms_aq.DEQUEUE_OPTIONS_T ;
    l_payload SYS.AQ$_JMS_TEXT_MESSAGE;
    l_message_properties dbms_aq.message_properties_t ;
    l_msg_id raw(32);
  begin
    --l_dequeue_options.visibility := dbms_aq.immediate;
    l_dequeue_options.visibility := dbms_aq.on_commit;
    l_dequeue_options.msgid := p_msg_id;    
    DBMS_AQ.DEQUEUE (
     queue_name          => p_queue,
     dequeue_options     => l_dequeue_options,
     message_properties  => l_message_properties,
     payload             => l_payload,
     msgid               => l_msg_id);
  end dequeue_msg;
  --
  procedure enqueue_msg(p_queue in varchar2, p_payload SYS.AQ$_JMS_TEXT_MESSAGE)
  is
    l_enqueue_options dbms_aq.ENQUEUE_OPTIONS_T ;
    l_message_properties dbms_aq.message_properties_t ;
    l_msg_id raw(32);
  begin
    --l_enqueue_options.visibility := dbms_aq.immediate;
    l_enqueue_options.visibility := dbms_aq.on_commit;
    DBMS_AQ.ENQUEUE (
     queue_name          => p_queue,
     enqueue_options     => l_enqueue_options,
     message_properties  => l_message_properties,
     payload             => p_payload,
     msgid               => l_msg_id);
  end enqueue_msg;
  --
begin
  for r_qtb in c_qtb loop
    l_payload := r_qtb.user_data;
    l_jms_type := r_qtb.user_data.header.type;
    l_sbl_correlation_id := get_jms_property(l_payload, 'SBLCorrelationID');
    l_parentComponentInstanceId := get_jms_property(l_payload, 'tracking_parentComponentInstanceId');
    dbms_output.put_line(r_qtb.queue||' - '||' - '||l_jms_type||' - '||r_qtb.msg_id||' - '||l_sbl_correlation_id||' - '||l_parentComponentInstanceId);
    enqueue_msg(l_dest_queue , l_payload);
    dequeue_msg(l_except_queue , r_qtb.msg_id);
  end loop;
end;

This script starts with a cursor that is based on the query described in the post mentioned above. It selects only the Expired messages, where the root-tag starts with a concatenation of '<' and the message type declared in the top. If there was a JMS type you could also select on the userdata.header.type attribute.

It logs a few attributes, merely for me to check if the base of the script worked, without the dequeue and the enqueue. The selecting of the particular JMS properties are taken from the earlier script and are an example on properties that you could use to more granularly determine if a message is eligable to be re-enqueued.

The found message is enqueued and then dequeued, both with visibility set to on_commit. This ensures that the enqueue and dequeue is done within the same transaction. You should hit the commit button in SQL Developer (or your other favorite Database IDE).

The from clause construct:

      from (
        select 'DWN_OUTBOUND_TABLE' queue_table
        , qtb.* 
        from AQ$DWN_OUTBOUND_TABLE qtb
      ) qtb

is from a script I created at the customer to query over all the available queue tables, by doing a union-all over all the queue-tables. That's why the first column names the queue table that is source for the record. 

This script can be made more dynamic by putting it in a package and make a pipelined function for the query, so that you can provide the queuetable to query from as a parameter. You could even loop over all the user_queue_tables to dynamically select all the message from all the tables without having to do union alls over the familiar queue tables. See my Object Oriented Pl/Sql article for more info and inspiration.

You might even have fun with Polymorphic Table Functions, the Patrick-ACE-Director-Bar-solutions is expert on that.


Tuesday 11 August 2020

The magic of CorrelationSets

CorrelationSets in BPEL are as old as the road to Rome. I wrote about it before: 

Although it was in the BPEL project from the very beginning, when Oracle acquired it in 2004, you might not have dealt with it before. But maybe not even realized that you can use it in Oracle Integration Cloud, with structured processes.

In the first week of june I got to do a presentation about this subject, in a series of Virtual Meetups.

If you weren't able to attend, but would like to watch it then you're in luck, it got recorded by Phil Wilkins:


In my presentation I start with a simple demo based on a BPEL process. I have put the resulting code on GitHub: https://github.com/makker-nl/blog/tree/master/CorrelationDemo

Then I move on to a more complicated situation in OIC. I created an export for that project and placed it on GitHub too: https://github.com/makker-nl/blog/tree/master/CorrelationDemoOIC

This allows you to inspect it and try to recreate it yourself.

My sincere appologies for this late sharing.

Wednesday 15 July 2020

Receive and send WSA Properties in BPEL 2.0

Last week I had the honour to present on CorrelationSets in a Virtual Meetup, which is a feature that relates to the WS-Addressing support of SOA Suite.

At my current customer, I had to rebuild a BPEL Process from 1.1 to 2.0, to be able to split it up using embedded and reusable  subprocesses.

One requitement is to receive the wsa-Action property and reply it back, concatenated with 'Response'.

Since it implements a WSDL with 3 operations, I need a Pick-OnMessage construction.

To receive properties you can open the activity, in my case the OnMessage:
In the source his looks like the following:
<onMessage partnerLink="MyService_WS" portType="ns1:myService" operation="myOperation"
                 variable="MyService_InputVariable">
        <bpelx:fromProperties>
          <bpelx:fromProperty name="wsa.action" variable="wsaAction"/>
        </bpelx:fromProperties>
With the wsaAction variable here is based on xsd:string.

However, this turns out not to work: the wsaAction variable stays empty.
This turns out to be a bug, that should have been solved since 11.1.1.6, but apparently still works as is. Read more about it in support document 1345071.1.

Solution is simple: just remove the wsa. prefix:
<onMessage partnerLink="MyService_WS" portType="ns1:myService" operation="myOperation"
                 variable="MyService_InputVariable">
        <bpelx:fromProperties>
          <bpelx:fromProperty name="action" variable="wsaAction"/>
        </bpelx:fromProperties>
For invoke, reply, receive and other activities it works the same.

As said, in my case I need to reply with a wsa.action that is a concatenation of the received action with 'Response'. This can be done using an expression:
Again, first choose wsa.action and then in the source remove the wsa. prefix:
<reply name="ReplyMyService" partnerLink="MyService_WS" portType="ns1:myService"
                 variable="MyService_OutputVariable" operation="myOperation">
            <bpelx:toProperties>
              <bpelx:toProperty name="action">concat($wsaAction, 'Response')</bpelx:toProperty>
            </bpelx:toProperties>
            <bpelx:property name="action" variable="WSAction"/>
          </reply>
Testing this in SoapUI or ReadyAPI will show:
<env:Envelope xmlns:env="http://schemas.xmlsoap.org/soap/envelope/" xmlns:wsa="http://www.w3.org/2005/08/addressing">
   <env:Header>
      <wsa:Action>http://www.darwin-it.nl/my/myServiceResponse</wsa:Action>
      <wsa:MessageID>urn:1694440c-c69a-11ea-bc81-0050569796a9</wsa:MessageID>
      <wsa:ReplyTo>
...

For more info on setting properties, see the docs.


Tuesday 30 June 2020

A little bit of insight in SOA Suite future


A few weeks ago I was made aware of a few announcements, which I think makes sense and that I want to pass on to my followers, sauced with a bit of my own perspective.

Containerized SOA

Last year I had made myself familar with the Oracle Weblogic Kubernetes Operator. See for instance my Cheat Sheet Serie. I also had the honour to talk about it during the Tech Summit at OUK in december '19. Weblogic under Kubernetes is apparently the way to go for Weblogic. And with that, also the Fusion Middleware Stack. However, until now only 'plain' Weblogic is supported under Kubernetes, on all Cloud platforms, as well as on your own on-premises Kubernetes platform.

It was no surprise that SOA Suite would follow, and in March there an early acces for SOA Suite on Kubernetes was announced.

In the announcement it is stated that Oracle will provide Container images for SOA Suite including OSB, that are also certified for deployment on production Kubernetes environments. Also documentation, support files, deployment scripts and samples.

Later on other components will be certified. This is good news, because it will allow SOA Suite be run in co-existence with cloud native applications and be part of a more heterogenous application platform. To me this makes sense. It makes High Availability and Disaster Recovery easier, but although the application landscape will be diverse and heterogenous, this makes the maintenance, install, deploy and upgrade of FMW within that landscape more uniformly aligned with other application compents like web applications, possible microservices, etc.

Paid Market Place offering

Another announcment I got recently is about the release of  a "Paid" listing of Oracle SOA Suite for Oracle Cloud Infrastructure" on the Oracle Marketplace. There was already a Bring Your Own Licence offering, that you could bring in to use your universal cloud credits to host your SOA Suite instance in the cloud. You could purchase a separate license, but now you can also use the Universal Cloud Credits  to have a paid, licensed instance of SOA Suite in the cloud, without the need to purchase a license.

And so there are two new offerings in the market place:
  • Oracle SOA Suite on Oracle Cloud Infrastructure (PAID)
  • Oracle SOA Suite with B2B EDI Adapter on Oracle Cloud Infrastructure (PAID)
These offerings include:
  • SOA with Service Bus & B2B Cluster, with additional leverage of the B2B EDI Adapter.
  • MFT Cluster
  • BAM
This will provide better options for deploying SOA Suite on OCI, to:
  • Provision SOA instances using OCI
  • Manage instances using OCI
  • Scale up/down/in/out using OCI
  • Backup/restore using OCI.
Oracle's focus on delivering SOA Suite from the Market place. It is expected that current SOA Cloud Service customers will migrate to this offering. The Marktet Place SOA Suite will be enhanced and improved with new capabilities and functions, that not necessarily will be added to the SOA CS.
Probably this will give Oracle a better and more uniform way to improve and deliver new versions of SOA Suite. It also makes sense in relationship to the SOA Suite on Containers announcement.

For new customers the Marketplace is the way to get SOA Suite. Existing customers can use the BYOL offering, but might need to move to the new offering when contract renewal might be opportune.

What about Oracle Integration Cloud (OIC)?

This is still Oracle's prime offering for integrations and process modelling. You should first look at OIC for new projects. Only if you're an existing SOA Suite customer and/or have specific requirements that drive the choice to SOA Suite and related components, then you should consider the Marketplace SOA Suite offering.

This makes the choices a bit clearer, I think.

Friday 19 June 2020

Use of correlation sets in SOA Suite

Years ago, I had plans to write a book about BPEL or at least a series of articles to be bundled as a BPEL Course. I stranded with only one Hello World article.

This year, I came up with the idea of doing something around Correlation Sets. Preparing a series of articles and a talk. And therefor, let's start with an article on Correlation Sets in BPEL. Maybe later on I could pick up those earlier plans again.

You may have read "BPEL", and tend to skip this article. But wait, if you use BPM Suite: the Oracle BPM Process Engine is the exact same thing as the BPEL Process engine! And if you use the Processes module of Oracle Integration Cloud: it can use Correlation Sets too. Surprise: again it uses the exact same Process Engine as Oracle SOA Suite BPEL and Oracle BPM Suite.

Why Correlation Sets?

Now, why Correlation Sets and what are those? You may be familiar with OSB or maybe Mulesoft, or other integration tools.
OSB is a stateless engine. What comes in is executed at once until it is done. So, services in OSB are inherently synchronous and short-lived. You may argue that you can do Asynch Services in OSB. But those are in fact "synchronous" one-way services. Fire & Forget, as you will. They are executed right away (hence the quoted synchronous) , until it is done. But the calling application does not expect a result (and thus asynchronous in the sense that the caller won't wait).

You could, and I have done it actually, create asynchronous request response services in OSB. Asynchronous Request Response services are actually two complementary one way fire & forget services. For such a WSDL both services are defined in different port types: one for the actual service consumer, and one callback service for the service provider. Using WS-Addressing header elements the calling service will provide a ReplyTo callback-endpoint and a MessageId to be provided by the responding service as an RelatesTo MessageId.

This RelatesTo MessageId serves as a correlation id, that maps to the initiating MessageId. WS- Addressing is a Webservice standard that describes the SOAP Header elements to use. As said, you can do this in OSB, OSB even has the WS-Addressing namespaces already defined. However, you have to code the determination and the setting of the MessageId and ReplyTo-Address yourself.

Because of the inherently stateless foundation of OSB the services are short-lived and thats why OSB is not suitable for long running processes. The Oracle SOASuite BPEL engine on the other hand, is designed to orchestrate Services (WebServices originally, but from 12c onwards REST Services as well) in a statefull way. This makes BPEL suitable for long running transactions as well. Because of that after the acquisition of Collaxa, the company who created the BPEL Engine, Oracle decided to replace it's own database product Oracle Workflow (OWF) with BPEL.  And SOA Suite and it's BPEL engine natively support WS-Addressing. Based upon an Async Request/Response WSDL it will make sure it adds the proper WS-Addressing elements and has a SOAP Endpoint to catch response messages. Based upon the RelatesTo message id  in the response it will correlate the incoming response with the proper BPEL process instance that waits for that message.

A BPEL process may run from a few seconds, to several minutes, days, months, or potentially even years. Although experience learned us that we wouldn't recommend BPEL services to run for longer than a few days. For real long running process you should choose BPM Suite or Oracle Integration Cloud/Process.

WS-Addressing helps in correlating response messages to requests that are sent out previously. But, it does not correlate Ad-Hoc messages. When a process runs for more than a few minuts, chances are that the information stored within the process is changed externally. A customer waiting for a some process may have relocated or even died. So you may need to interact with a running process. You want to be able to send a message with the changed info to the running process instance. And you want to be sure that the engine correlates the message to the correct instance. Correlation Sets help with these ad-hoc messages that may or may not be send at any time during the running of the process.

An example BPEL process

Let's make a simple customer processing process that reads an xml file and processes it and writes it back to an xml file.
My composite looks like:
It has two File Adapter definitions, an exposed service that polls on the /tmp/In folder for customer*.xml files. And a reference service that writes an xml file into the /tmp/Out folder as customer%SEQ%_%yyMMddHHmmss%.xml. I'm not going to explain how to setup the File adapters, that would be another course-chapter.

For both adapters I created the following XSD:
<?xml version="1.0" encoding="UTF-8" ?>
<xsd:schema xmlns:xsd="http://www.w3.org/2001/XMLSchema" xmlns:cmr="http://xmlns.darwin-it.nl/xsd/demo/Customer"
            targetNamespace="http://xmlns.darwin-it.nl/xsd/demo/Customer" elementFormDefault="qualified">
  <xsd:element name="customer" type="cmr:CustomerType">
    <xsd:annotation>
      <xsd:documentation>A customer</xsd:documentation>
    </xsd:annotation>
  </xsd:element>
  <xsd:complexType name="CustomerType">
    <xsd:sequence>
      <xsd:element name="id" maxOccurs="1" type="xsd:string"/>
      <xsd:element name="firstName" maxOccurs="1" type="xsd:string"/>
      <xsd:element name="lastName" maxOccurs="1" type="xsd:string"/>
      <xsd:element name="lastNamePrefixes" maxOccurs="1" type="xsd:string" minOccurs="0"/>
      <xsd:element name="gender" maxOccurs="1" type="xsd:string"/>
      <xsd:element name="streetName" maxOccurs="1" type="xsd:string"/>
      <xsd:element name="houseNumber" maxOccurs="1" type="xsd:string"/>
      <xsd:element name="country" maxOccurs="1" type="xsd:string"/>
    </xsd:sequence>
  </xsd:complexType>
</xsd:schema>
(Just finishing this article, I encounter that I missed a city element. It does not matter for the story, but in the rest of the example I use the country field for city.)

The first iteration of the BPEL process just receives the file from the customerIn adapter, assigns it to the the input variable of the invoke of the customerOut adapter and invokes it:

Deploy it to the SOA Server and test it:

[oracle@darlin-ind In]$ ls ../TestFiles/
customer1.xml  customer2.xml
[oracle@darlin-ind In]$ cp ../TestFiles/customer1.xml .
[oracle@darlin-ind In]$ ls
customer1.xml
[oracle@darlin-ind In]$ ls
customer1.xml
[oracle@darlin-ind In]$ ls
customer1.xml
[oracle@darlin-ind In]$ ls
[oracle@darlin-ind In]$ ls ../Out/
customer2_200617125051.xml
[oracle@darlin-ind In]$
The output customer hasn't changed and is just like the input:
[oracle@darlin-ind In]$ cat ../Out/customer2_200617125051.xml
<?xml version="1.0" encoding="UTF-8" ?><customer xmlns:xsi="http://www.w3.org/2001/XMLSchema-instance" xsi:schemaLocation="http://xmlns.darwin-it.nl/xsd/demo/Customer ../Schemas/Customer.xsd" xmlns="http://xmlns.darwin-it.nl/xsd/demo/Customer">
  <id>1001</id>
  <firstName>Jean-Michel</firstName>
  <lastName>Jarre</lastName>
  <gender>M</gender>
  <streetName>Rue d'Oxygene</streetName>
  <houseNumber>4</houseNumber>
  <country>Paris</country>
</customer>
[oracle@darlin-ind In]$

This process is now rather short-lived and doesn't do much except for moving the contents of the file. Now, let's say that this processing of the file takes quite some time and but during the processing the customer can have relocated, or died or has otherwise changed it's information.

I expanded my composite with a SOAP Service, based on a One-Way WSDL, that is based upon the same xsd:
And this is how I changed the BPEL:


In this example, after setting the customer to the customerOut variable, there is a long running  "customer processing" sequence, that takes "about" 5 minutes.

But in parallel it now also listens to the UpdateCustomer partnerlink using a Receive. This could be done in a loop to also receive more follow-up messages.

This might look like a bit unnecessarily complex, with the throw and catch combination. But the thing with the Flow activity is that it completes only when all the branches are completed. So, you need a means to "kill" the Receive_UpdateCustomer activity. Adding  a Throw activity does this nicely. Although the activity is colored red, this is not an actual Fault exception. I use it here as a flow-control activity. It just has a simple fault name, that I found the easiest to enter in the source:
<throw name="ThrowFinished" faultName="client:Finished"/>

This is because you can just use the client namespace reference. While in the designer you should provide a complete namespace URI:

Same counts for the Catch, after creating one, it's easier to add the namespace from the source:
        <catch faultName="client:Finished">
          <assign name="AssignInputCustomer">
            <copy>
              <from>$ReceiveCustomer_Read_InputVariable.body</from>
              <to expressionLanguage="urn:oasis:names:tc:wsbpel:2.0:sublang:xpath1.0">$Invoke_WriteCustomerOut_Write_InputVariable.body</to>
            </copy>
          </assign>
        </catch>

Side-note: did you know that if you click on an activity or scope/sequence in the Designer and switch to the source, the cursor will be moved to the definition of the activity you selected? To me this often comes handy with larger BPELs.

By throwing the Finished exception the flow activity is left and by that all the unfinished branches are also closed and by that the Receive is quit too.

When you get a SOAP message in the bpel example above you would still wait for finishing the process branch. You probably also need to notify the customer processing branch that the data is changed. That can be done in the same way, by doing a throw of a custom exception.

How to define Correlation Sets

The example above won't work as is. Because, how does BPEL know to which process instance the message has to be sent? We need to create a Correlation set. And to do so we need to define how we can correlate the UpdateCustomer message to the customerIn message. Luckily there is a Customer.id field. For this example that will do. But keep in mind: you can have multiple processes running for a customer. So you should add something that will identify the instance.

You can add and edit correlation sets on the invoke, receive, and pick/onMessage activities. But also from the BPEL menu:


Then you can define a Correlation Set:


As you can see you can create multiple Correlation Sets, each with one or more properties. In the last window, create a property, then select it for the Correlation Set and click ok. Up to the first dialog.


You'll see that the Correlation Set isn't valid yet. What misses, what I didn't provide in the last dialog, are the property aliases. We need to map the properties to the messages.
I find it convenient to do that on the activities, since we also need to couple the correlation Sets to particular Invoke, Receive, and/or Pick/OnMessage activities. Let's begin with the first receive:


Select the Correlations tab, and add the Correlation Set. Since this is the activity that the Customer Id first appears in a message in the BPEL processe, we need to initiate the Correlation Set. This can also be done on an invoke, when calling a process that may cause multiple ad-hoc follow-up messages. So, set the Initiate property to yes.
Also, here you can have multiple correlation sets on an activity.

Then click the edit (pencil) button to edit the Correlation Set. And add a property alias:

To find the proper message type, I find it convenient to go through the partnerlink node, then select the proper WSDL. From that WSDL choose the proper message type. Now, you would think you could select the particular element. Unfortunately, it is slightly less user-friendly. After choosing the proper message type in the particular WSDL, click in the query field and type CTRL-Space. A balloon will pop up with the possible fields and when the field has a child element, then a follow-up balloon will pop-up. Doing so, finish your xpath, and click as many times on Ok to get all the dialogs closed properly.

Another side-node, the CTRL-Space way of working with balloons also works with the regular expression builder in with creating Assign-Copy-rules. Sometimes I get the balloons un-asked for, which I actually find annoying sometimes.

Do the same for the customer update Receive:
Here it is important to select No for the initate: we now adhere to the initiated Correlation Set.

Wrap this up, deploy the composite and test.

Test Correlations

As in the first version copy an xml file to the /tmp/In folder. This results in a following BPEL Flow:

The yellow-highlighted activities are now active. So, apparently it waits for a Receive and for the processing (Wait activity).

From the flow trace you can click on the compositename, besides the instance id, and then click on the Test button:
And enter new values for your customer:


In the bottom right corner you can click on the "Test Web Service" button, and from the resulting Response tab you can click on the launch flow trace.

You'll find that the Receive has been done, and the Assign after that as well. Now, only the Wait activity is active.


After processing the flow it throws a Finished exception, and finishes the BPEL Flow.
In this case the Receive was earlier than finisihing the Wait activity. So, in this flow the throw is unnecessary, but when the message wasn't received, then the throw is needed.

Looking in the /tmp/Out folder we see that the file is updates neatly from the Update:
[oracle@darlin-ind In]$ ls ../Out/
customer2_200617125051.xml  customer3_200619160921.xml
[oracle@darlin-ind In]$ cat ../Out/customer3_200619160921.xml
<?xml version="1.0" encoding="UTF-8" ?><ns1:customer xmlns:ns1="http://xmlns.darwin-it.nl/xsd/demo/Customer">
            <ns1:id>1001</ns1:id>
            <ns1:firstName>Jean-Michel</ns1:firstName>
            <ns1:lastName>Jarre</ns1:lastName>
            <ns1:lastNamePrefixes/>
            <ns1:gender>M</ns1:gender>
            <ns1:streetName>Equinoxelane</ns1:streetName>
            <ns1:houseNumber>7</ns1:houseNumber>
            <ns1:country>Paris</ns1:country>
        </ns1:customer>[oracle@darlin-ind In]$

A bit of techie-candy

Where is all this beautifull stuff registered?
First of all, for the Correlation properties, you will find a new WSDL has appeared:

At the top of the source of the BPEL you'll find the following snippet:
 <bpelx:annotation>
    <bpelx:analysis>
      <bpelx:property name="propertiesFile">
        <![CDATA[../WSDLs/ProcessCustomer_properties.wsdl]]>
      </bpelx:property>
    </bpelx:analysis>
  </bpelx:annotation>
  <import namespace="http://xmlns.oracle.com/pcbpel/adapter/file/CorrelationDemo/CorrelationDemo/customerIn"
          location="../WSDLs/customerIn.wsdl" importType="http://schemas.xmlsoap.org/wsdl/" ui:processWSDL="true"/>

Here you see a reference to the properties wsdl. Also an import of the customerIn.wsdl. Let's take a look in there:
<?xml version= '1.0' encoding= 'UTF-8' ?>
<wsdl:definitions
     name="customerIn"
     targetNamespace="http://xmlns.oracle.com/pcbpel/adapter/file/CorrelationDemo/CorrelationDemo/customerIn"
     xmlns:tns="http://xmlns.oracle.com/pcbpel/adapter/file/CorrelationDemo/CorrelationDemo/customerIn"
     xmlns:jca="http://xmlns.oracle.com/pcbpel/wsdl/jca/"
     xmlns:plt="http://schemas.xmlsoap.org/ws/2003/05/partner-link/"
     xmlns:pc="http://xmlns.oracle.com/pcbpel/"
     xmlns:imp1="http://xmlns.darwin-it.nl/xsd/demo/Customer"
     xmlns:wsdl="http://schemas.xmlsoap.org/wsdl/"
     xmlns:cor="http://xmlns.oracle.com/CorrelationDemo/CorrelationDemo/ProcessCustomer/correlationset"
     xmlns:bpel="http://docs.oasis-open.org/wsbpel/2.0/process/executable"
     xmlns:vprop="http://docs.oasis-open.org/wsbpel/2.0/varprop"
     xmlns:ns="http://oracle.com/sca/soapservice/CorrelationDemo/CorrelationDemo/Customer"
    >
    <plt:partnerLinkType name="Read_plt">
        <plt:role name="Read_role">
            <plt:portType name="tns:Read_ptt"/>
        </plt:role>
    </plt:partnerLinkType>
    <vprop:propertyAlias propertyName="cor:customerId" xmlns:tns="http://xmlns.oracle.com/pcbpel/adapter/file/CorrelationDemo/CorrelationDemo/customerIn"
         messageType="tns:Read_msg" part="body">
        <vprop:query>imp1:id</vprop:query>
    </vprop:propertyAlias>
    <vprop:propertyAlias propertyName="cor:customerId" xmlns:ns13="http://oracle.com/sca/soapservice/CorrelationDemo/CorrelationDemo/Customer"
         messageType="ns13:requestMessage" part="part1">
        <vprop:query>imp1:id</vprop:query>
    </vprop:propertyAlias>
    <wsdl:import namespace="http://oracle.com/sca/soapservice/CorrelationDemo/CorrelationDemo/Customer"
         location="Customer.wsdl"/>
    <wsdl:import namespace="http://xmlns.oracle.com/CorrelationDemo/CorrelationDemo/ProcessCustomer/correlationset"
         location="ProcessCustomer_properties.wsdl"/>

Below the partnerLinkType you find the propertyAliases.
Especially with older, migrated processes, this might be a bit tricky, because you might get the property aliases not in the wsdl you want. Then you need to register the proper wsdl in the BPEL and move the property aliases to the other wsdl, together with the vprop namespace declaration.
When you move the WSDL to the MDS for reuse, move the property aliases to another wrapper WSDL. You shouldn't move the property aliases to the MDS with it. Because they belong to the process and shouldn't be shared, but also it makes it impossible for the designer to change. I'm not sure if it even would work. Probably it does, but you should not have that.

As I mentioned before, you can have multiple Correlation Sets in your BPEL (or BPMN) process and even on an activity. In complex interactions this may make perfectly sense. For instance when there is overlap. You  may have initiated one Correlation Set on an earlier Invoke or Receive, and use that to correlate to another message in a Receive. But that message may have another identifying field that can be used to correlate with other interactions. And so you may have a non-initiating Correlation Set on an activity that initiates another one. Maybe even based on different property-aliases on the same message.

Pitfalls

Per CorrelationSet you can have multiple properties. They are concatenated on to a string. Don't use too many properties to make-up the correlation set. Perferably only one. And use short scalar elements for the properties. In the past the maximum length was around 1000 characters. I've no idea what it is now. But multiple properties and property aliases may make it error-prone. During the concatenation, a different formatting may occur. It is harder to check, validate if the correlation elements in the messages conform with eachother.

In the example above I used the customer id for the correlation property. This results in an initiated correlation set where the UpdateCustomer Receive is listening for. If you would initiate another process instance for the same customer, the process engine will find at the UpdateCustomer Receive that there already is a (same) Receive with the same Correlation Set. And will fail. The process engine identifies the particular activity in the process definition and the combination process-activity and Correlation Set is unique. A uniqueness violation at this point will result in a runtime fault.

It doesn't matter if the message is initiate before of after the Receive is activated. If you would be so fast to issue an UpdateCustomer request before the process instance has activated the Receive, then it will be stored in a table, and picked up when the Receive activity is reached.

Conclusion

This may be new to you and sound very sophisticated. Or, not of course, if you were already familiar with it. If this is new to you: it was already in the product when Oracle acquired it in 2004!
And not only that, you can use it in OIC Processes as well. Also for years. I wrote about that in 2016.

More on correlation sets, check out the docs.