
One of the fine things about using Linux is having a real XWindows Server. Why is that do you think? As an Oracle Specialist it occurs from time to time that I have to do an installation on a unix or linux server. Since it is a server usually it does not have a graphical environment. But the Oracle Installer is a graphical application.
So either you have to reroute the graphical output of your application to your XServer or you have to use a remote desktop application like VNC.
If you server does not support a VNCServer you are stuck to the first option (having to reroute the x-output to an xserver on your desktop). On a windows-machine you have to use an X-Windows emulater like cygwin. But on Linux you could do with your native XServer.
But I whished it would be as simple as that. In fact it is quite simple, but it turned out not by default. There are a few prerequisites to be met.
1. Your remote-server, which actually is the X-Client, should be setup to forward X.
You can verify this in the file /etc/ssh/sshd_config. There you should find the option:
X11Forwarding yes
In the wiki http://gentoo-wiki.com/HOWTO_X-forwarding you can find more info about that. But unfortunately you might not have the rights even to look into the file. So you probably need to consult your system's administrator.
2. Now you could try to log on to the server with a terminal session from your Linux (or XWindows emulator).
Run:
ssh -X user@remote-host
or
ssh -Y user@remote-host
The difference is that -Y is not secure while -X is. Be aware that -X is capital. Using the lower-case -x turns the X-forwarding off on your ssh-tunnel. To speed things up you could put a C after -Y or -X.
3. Verify your DISPLAY.
Step 2 actually should do the trick. But trust everything though verify your trust, by:
echo $DISPLAY
This should give you a line like:
localhost:10.0
The -X or -Y option should have set the DISPLAY for you. To test it you could run xclock on the terminal. It should display a graphical clock on your desk.
If your DISPLAY is not set then set it using the following:
export DISPLAY=your-desktop-ip:0.0
The ip of your desktop can be found by running
who am i
in the terminal. Also you could find it by opening a terminal on your local desktop and running ifconfig.
Retry running xclock.
4. Shields up eh.. Shields down
You might turn in to an error like:
Error: Can't open display:
Or another message that denotes that it can't get a connection to your Display.
The latter is simply solved by issuing:
xhost +
This allows all incomming X-requests. In stead of the '+' you could narrow it down by specifying the particular host-name.
Mark that when "ssh -X yourname@remotehost" did set your Display right, your working with X over an ssh tunnel and you should not need to have 'xhost +' issued.
5. Hey, put this shield down
I encountered that this still did not work in my case. I use a Ubuntu distibution using Gnome. And for distributions counts that the [xdmcp] functionality is turned off. XCMCP is the protocol that allows remote login via X. This is recommended since normally you do not want to have 'bad guys' hacking into your XServer. So every X-request is denied.
I solved this by editing my /etc/gdm/gdm.conf by:
sudo gedit /etc/gdm/gdm.conf
Find [xdmcp] and modify the Enabled property:
Enable=true
Then you need to restart GDM, either by logging off or restarting your machine.
Please do not forget to turn it to false after your finished your job!.
Try to do the ssh -X and set your display on your-ip-address:0.0.
Then xclock should work.
6. Hey, I said: put this shield down
After this it worked for me. But I turned of login-security in an earlier stage. So in Ubuntu (7.10 Gutsy Gibbon) goto System/Administration/Login Window. Go to the Security tab and switch of 'Deny TCP connections to Xserver' and the related checkboxes. This did not do the trick for me in the first place. But maybe this was because I did not restart GDM.
Also for this point counts: for your own safety please recheck the boxes afterwards.
Conclusion
At the end I got it working with a little help of my Google-friend. And then it turns out to be simple. So for your convenience and mine I put these steps together in one article.
Thursday, 20 March 2008
Tuesday, 4 March 2008
Configuration of the FTP Synchronous Get and FTP Put adapters
The FTP adapter is convenient for reading and writing "known" files from a "known" host. That is using the FTP Adapter wizard you're more or less required to give in fixed values for this. The Host, username and passwords are by default retrieved from a jndi-location.
But what if you don't know the filenames at run-time? Well then you can use the Adapter Header variable. But it turns out that the FTP Header does not provide means to give in the host, port, username and password at run-time. At default BPEL PM or ESB assumes that an adapter listens or writes to a fixed location.
Luckily it is possible to provide these at runtime. Doing so, you can create a generic FTP process. For Get-purposes you'll have to use the Synchronous get. The regular get is only usefull for polling adapters or when using Correlation-Sets.
I'll explain the configuration of the Synchronous Get service first. Then I'll explain the Put-service..
Synchronous Get
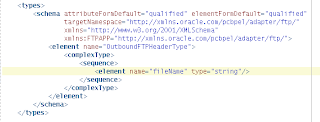
Copy the fileName element and name it “directory” to have it a directory entry also:

This seams to be a bug, the wizard won't create this element.

Excuse me for the small screendumps. The Blog has some difficulties with XML-fragments.
But what if you don't know the filenames at run-time? Well then you can use the Adapter Header variable. But it turns out that the FTP Header does not provide means to give in the host, port, username and password at run-time. At default BPEL PM or ESB assumes that an adapter listens or writes to a fixed location.
Luckily it is possible to provide these at runtime. Doing so, you can create a generic FTP process. For Get-purposes you'll have to use the Synchronous get. The regular get is only usefull for polling adapters or when using Correlation-Sets.
I'll explain the configuration of the Synchronous Get service first. Then I'll explain the Put-service..
Synchronous Get
Create a partnerlink for a FTP Adapter. Accept the default JNDI name. Give it a proper service name, for instance: “FTPSynchGet”.
For the file-type choose “binary”, for the operation type choose “Synchronous Get File”.
For the directory name give a dummy directory, for instance “/tmp”. Uncheck the checkbox for deleting the file afterwards. (Probably we'll have to check it in the end solution, but for now I don't want it. It might be a good idea to have a deleting adapter and a non-deleting one if it is necessary to choose between these options).
Give the filename a dummy value, for instance “tmp.txt”.
Check the box “Native formatting is not required (Schema is Opaque)”.
Since it is a synchronous get, you have to invoke it, so use an invoke activity, and not a receive activity. The adapter wizard should have created a ftpAdapterOutboundHeader.wsdl. This is because the synchronous get is to be invoked having a header variable that specifies which file to get. By default the schema type that is created in it only contains a “fileName” element:

Copy the fileName element and name it “directory” to have it a directory entry also:

This seams to be a bug, the wizard won't create this element.
At the adapter-tab of the invoke activity properties define a header-variable based on the message-type in this wsdl. This variable can be used to define the input file and directory.
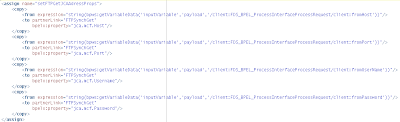
The FTPSynchGet.wsdl has a service with a jca:address that is based on a JNDI-location:

Replace this one to have it based on a ManagedConnectionFactory with mcf properties:

This way you can specify the the hosname, username and password on runtime with an assign statement.
To do this add an assign activity before the invoke. Add copy-rules to it for the host-name, username and password, where these values are fetch from a variable with an expression. This expression is based with on a bpws:getVariableData() statement within a string() function. The bpws:getVariableData() statement returns a XML-Node, but it needs to be serialized to a string using the string() function. The target should be the FTPSynchGet partnerlink with a bpelx:property. This bpelx:property should be one of:
jca.mcf.Host
- jca.mcf.Port
- jca.mcf.Username
- jca.mcf.Password

Then add an assign activity to copy the values for the filename and directory to the header variable.
FTP Put
The configuration of the FTPPut partnerlink is mainly the same as the configuration of the FTPSynchGet. Create a partnerlink, accept the JNDI location, choose File Type “binary”, Operation “Put”, give in a default directory and filenaming convention. It is then important to uncheck the “Number of messages equals” box. If you don't, the wsdl wil contain the attribute 'NumberMessages="1"' in the jca:operation element. This will lead into the error:
ORABPEL-11061
Batching is not allowed if dynamic directories are specified.
Batching is not allowed if dynamic directories are specified.
Please ensure that parameters such as NumberMessages, ElapsedTime or FileSize are not defined in the case of dynamic directories.
Removing the attribute will solve this.
Finish the wizard, with choosing an opaque schema.
Also in the FTPPut.wsdl the jndi-location in the jca:address should be replaced with the ManagedConnectionFactory like in the FTPSynchGet.
Add an invoke activity for the FTPPut partnerlink, and define a header variable on the adapter-tab, based on the message type in the ftpAdapterOutboundHeader.wsdl.
Then you can add comparable assign statements for the Hostname, username, password, filename and directory as described with the FTPSynchGet.
Don't forget to assign the Base64-encoded value to the input variable of the invoke of the FTP Put. For example the value of the outputvariable of the invoke of the FTPSynchGet.
Excuse me for the small screendumps. The Blog has some difficulties with XML-fragments.
Subscribe to:
Posts
(
Atom
)


